I will edit this post when i finish writing the actual guide, but i finished my entire dashboard and took and edited pics... some are self explanitory but i will write the text later. this stupid conversion took me like an entirety of 2 days, figuring everything out... geez. youre welcome.
Previous Guage Cluster LED DIY: http://www.m1xe.com/pics/diyleds/index.html
CLIMATE CONTROL LED DIY - new! :::
http://www.m1xe.com/pics/diyleds/OTHER/index.html
---------------------------------------------------------------------------------------------------------------
NOTICE: ALL LEDS that i used were 3mm super blue ones... i sanded the tops of ALL of them to be flat and rippled to make a softer, more even output.... i DEFINATELY suggest u do the same. u will have bright hotspots all over if u dont. also i used all 560 ohm resistors (green blue brown and gold=5% tolerance) .25 watt resistors (besides the dimmer knob- that was an old .5 watt, no reason for it, it was just the first one i found). the LED's i used were from LSDIODES.COM and the resistors i already had... can be bought at radio shack.
GOOD SOURCES FOR LEDs:
- superbrightleds.com
- autolumination.com
- ebay.com
- digikey.com
---------------------------------------------------------------------------------------------------------------
CRUISE CONTROL BUTTON
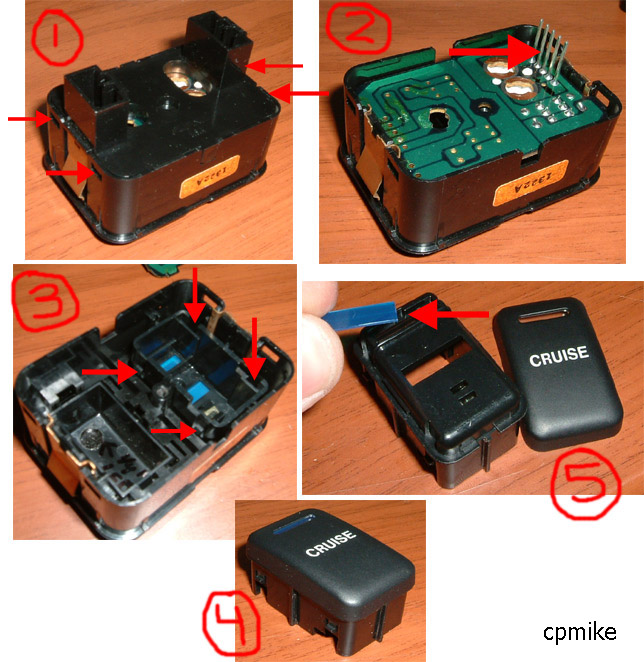
replace peanut bulbs w/ 2 LEDs (shown below)
in the pic, the bulb closest to the camera has + on the right (against the black plastic plug housing)... the other one is opposite.
1. unclip back by undoing 4 clips
2. pull circuit board out by the pins- pull hard, its clipped in
3. push tabs to remove the actual button
4. unclip button cap from base to get to #5
5. replace green plastic w/ strip of blue.
---------------------------------------------------------------------------------------------------------------
SMALL PEANUT LEDS
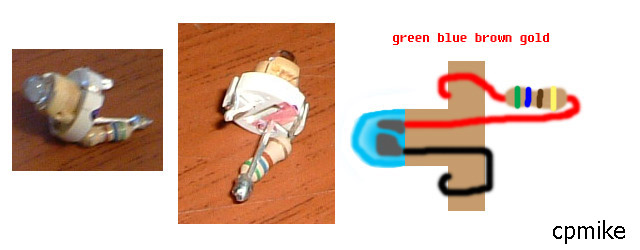
unwrap bulb from base, install LED as shown. used in the cruise control, and same idea is used for other ones too.
---------------------------------------------------------------------------------------------------------------
LIGHT DIMMER KNOB
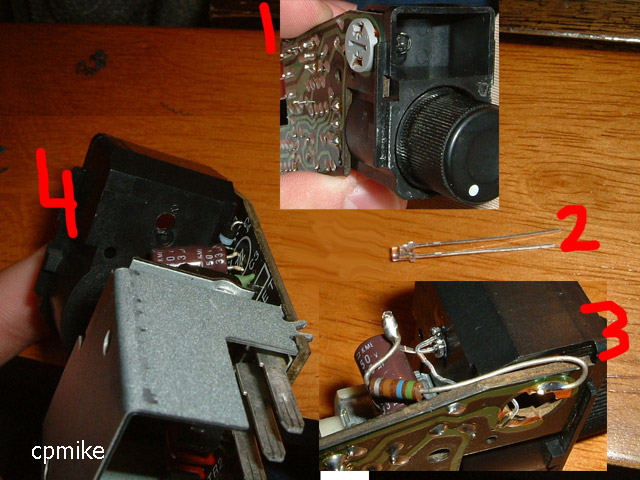
i misnumbered 3 and 4 - they are swapped.
1. remove grey-based peanut bulb
2. shave/sand top of LED flat
4(should be 3). drill hole behind faceplate and glue LED into it
3(should be 4). wire up LED and resistor and solder to old bulb spot
---------------------------------------------------------------------------------------------------------------
REAR DEFROST BUTTON
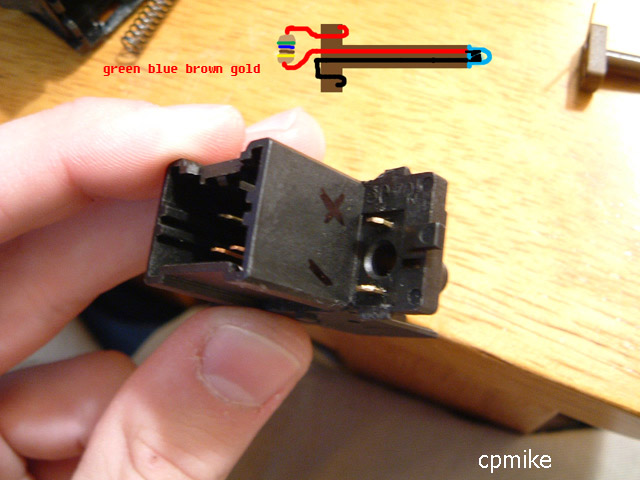
the indicator light LED on this button keeps blowing for me... gotta redo it and find out why and ill edit this post.
replace bulb in back of button w/ LED as shown in drawing (same as peanut LED just longer)
---------------------------------------------------------------------------------------------------------------
DASH CLOCK

**** CORRECTION: COLOR OVER THE GLASS DISPLAY WITH A BLUE SHARPIE MARKER... it looks better than using the plastic layer!! ****
Previous Guage Cluster LED DIY: http://www.m1xe.com/pics/diyleds/index.html
CLIMATE CONTROL LED DIY - new! :::
http://www.m1xe.com/pics/diyleds/OTHER/index.html
---------------------------------------------------------------------------------------------------------------
NOTICE: ALL LEDS that i used were 3mm super blue ones... i sanded the tops of ALL of them to be flat and rippled to make a softer, more even output.... i DEFINATELY suggest u do the same. u will have bright hotspots all over if u dont. also i used all 560 ohm resistors (green blue brown and gold=5% tolerance) .25 watt resistors (besides the dimmer knob- that was an old .5 watt, no reason for it, it was just the first one i found). the LED's i used were from LSDIODES.COM and the resistors i already had... can be bought at radio shack.
GOOD SOURCES FOR LEDs:
- superbrightleds.com
- autolumination.com
- ebay.com
- digikey.com
---------------------------------------------------------------------------------------------------------------
CRUISE CONTROL BUTTON

replace peanut bulbs w/ 2 LEDs (shown below)
in the pic, the bulb closest to the camera has + on the right (against the black plastic plug housing)... the other one is opposite.
1. unclip back by undoing 4 clips
2. pull circuit board out by the pins- pull hard, its clipped in
3. push tabs to remove the actual button
4. unclip button cap from base to get to #5
5. replace green plastic w/ strip of blue.
---------------------------------------------------------------------------------------------------------------
SMALL PEANUT LEDS

unwrap bulb from base, install LED as shown. used in the cruise control, and same idea is used for other ones too.
---------------------------------------------------------------------------------------------------------------
LIGHT DIMMER KNOB

i misnumbered 3 and 4 - they are swapped.
1. remove grey-based peanut bulb
2. shave/sand top of LED flat
4(should be 3). drill hole behind faceplate and glue LED into it
3(should be 4). wire up LED and resistor and solder to old bulb spot
---------------------------------------------------------------------------------------------------------------
REAR DEFROST BUTTON

the indicator light LED on this button keeps blowing for me... gotta redo it and find out why and ill edit this post.
replace bulb in back of button w/ LED as shown in drawing (same as peanut LED just longer)
---------------------------------------------------------------------------------------------------------------
DASH CLOCK

**** CORRECTION: COLOR OVER THE GLASS DISPLAY WITH A BLUE SHARPIE MARKER... it looks better than using the plastic layer!! ****


 good write up.


 i peeled up the black plastic layer w/ the printing on it to get to the white plastic frame below... went slow w/ a small screwdriver. once thats off u can pull the white part out and find a place to run the wires thru to the other side and hook them up to that lone bulb sticking out of the back.


Comment