Announcement

Collapse
No announcement yet.

my h22a swap journal

Collapse
X
 
  • Filter
  • Time
  • Show
Clear All
new posts

    #31
    Great work Timmy This is a great thread, I was very excited to read all of it!

    Dan

    Comment


      #32
      Yea H22 is smog legal and it is better to pass with a BAR tag. Just so cops have less to say cause it is CA legal.

      Comment


        #33
        Congrads on the swap Tim Be sure and post some pics and details about the wiring, as I hear it is extensive. Can't wait to see what you've encountered post swap too.

        My swap thread
        Main relay proplems?--DIY

        Comment


          #34
          A JDM H22A motor with a bad knock sensor w/check engine light on using an F22 Oxygen Sensor will pass smog. The stock P13 in limp mode will still run clean and pass smog.
          www.stickydiljoe.com

          Comment


            #35
            awsome timmy cant wait to see how it all turns out..

            Comment


              #36
              damn timmy im proud of you son. Too bad my car had a sad departure we could of rolled together. 1 h22 cb7 down... 1 h22 cb7 to replace it. good luck with everything. if you want my block off plates timmy i can save em for you. I'll just part it out from my motor. they deserve to be yours. since you always vouched about my block off plates.

              Comment


                #37
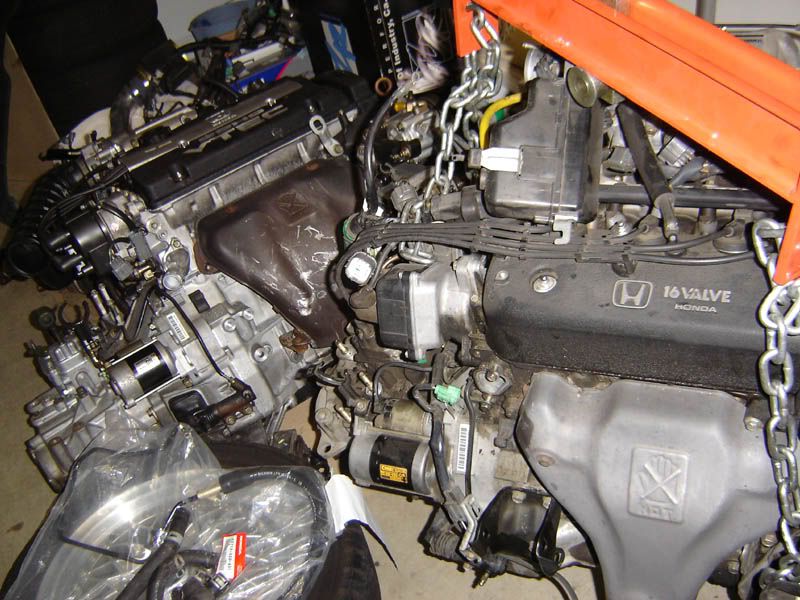
                Timmy I think you win the "Nicest valve cover that came from an engine supplier award". Looks good and can't wait to see some more pictures.
                My Members' Ride Thread - It's a marathon build, not a sprint. But keep me honest on the update frequency!

                Comment


                  #38
                  the wiring is all explained in the swap guide. it really isn't that extensive but there are special cases especially when you have a DX/LX like myself. i'll try and address them in here.

                  i will try to initially pass the motor under the sniffer before going to the ref. if what stickydiljoe says is true, then i can pass right now . but of course i want the car in its best shape before testing. the check engine light owns me right now!

                  and yes jed it would be nice to use your block off plates. the jdm motors already have a blockoff plate for the air boost valve but the EGR i may need. again i won't do it until i pass the BAR. thanks bro and i hope you can get back on your feet!

                  and yes jarrett the v/c is nice but the plastic wire cover is messed up. better that then the v/c though right? hmotorsonline thoroughly cleans their motors before deployment and they all look like that when you buy from them .
                  1cor10:31
                  - 92 LX coupe
                  - 96 EX wagon (sold)

                  Comment


                    #39
                    tim, i've been paying attention, but haven't written anything. great job! hopefully i'll be at tab soon (last month was crazy for me) to be able to check it out.

                    i'm glad the guys at 16.18.22 were able to help out.
                    your parents were extremely generous to let you use the garage.
                    most of all, i like how you were 'bout it! rather than talk a good game about getting an h swap in the future, you went and did the damn thing. i'm definitely proud of ya!


                    absence of evidence is not evidence of absence.

                    Comment


                      #40
                      thanks el. i hope your ride is coming along too! that's what i love about tabtuesdays; the support and amount of "hookup" you can get by networking with the different groups of people who attend. i debuted the car last week but unforunately it was raining and it seems it will be raining this tuesday as well . a handful of people saw it though including ron. i hope for you to see it soon too .
                      1cor10:31
                      - 92 LX coupe
                      - 96 EX wagon (sold)

                      Comment


                        #41
                        update! part two of my journal is here for your viewing and reading pleasure.


                        with the motor out, i took time to clean out the bay as much as i could. there were random leaves and dirt at the nooks and crannies. people suggested to do some wire tucking but i’d rather spend my time getting the car on the road. i’ve been anxious since the day i brought the motor home.

                        here is my list to do in the engine bay before reinstalling the motor:
                        -rear motor mount insert install
                        -weld power steering high pressure line (prelude line to accord rack-and-pinion)
                        -new heater core hoses install
                        -redrill the downpipe flange to work with accord cat
                        -install new insulation on the a/c lines
                        -figure out where to pass the wires for the ecu

                        i had a topic regarding a the rear motor mount insert issue a while back. it is found here:
                        http://www.cb7tuner.com/vbb/showthread.php?t=38520
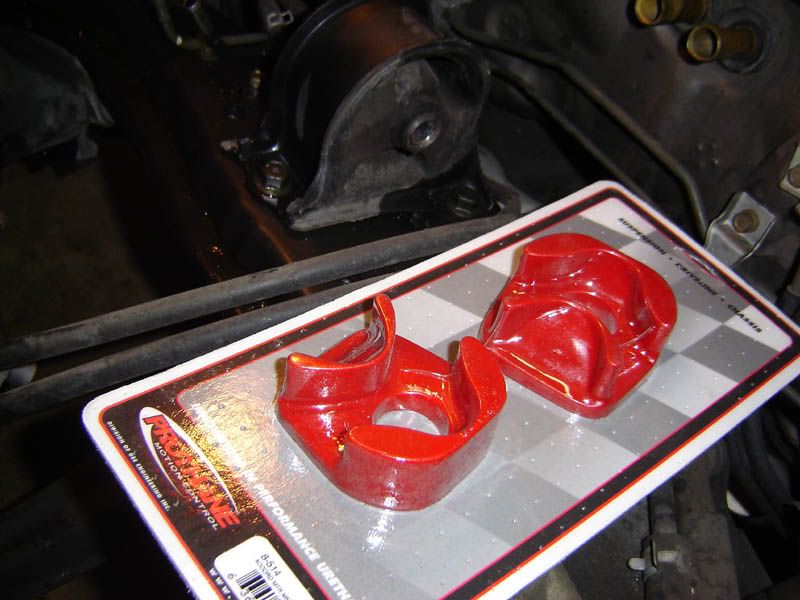
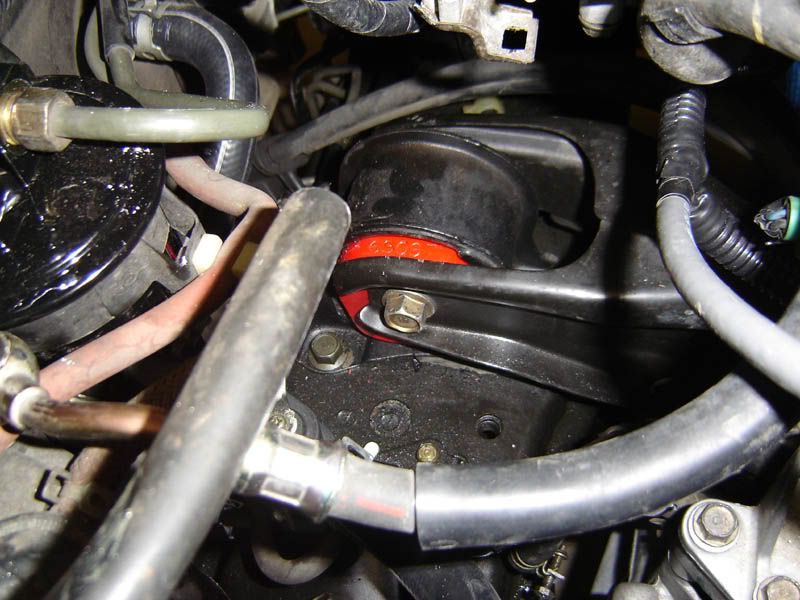
                        i went ahead and ordered the part off nopi.com and this is what i received. it seems prothane is the only company that makes an insert kit for our rear motor mounts. it looked to be the correct part from the looks of the insert and the mount. i won’t know for sure until it is installed. again i chose to go with an insert b/c i didn’t want to go through the hassle of the poly fill (dry time, taping, ordering, etc). i knew the pros and cons and chose to go this route.

                        NOTE: this prothane mount insert kit is ONLY available for DX and LX with manual transmissions! you must swap over to this mount and bracket if you want to use this insert kit.

                        with the motor mount somewhat taken care of i went ahead and took a look at the power steering high pressure line. i wanted to keep this accessory so i had two choices; use the accord line with the accord pump, or use the prelude pump and custom the prelude line to work with the rack-and-pinion. i never liked the look of the accord pump with the h22a. it just looked out of place and there were only two bolts holding the bracket to the block. so i decided to use the prelude pump and ordered the prelude high pressure line from the dealer. it cost $100 ouch!

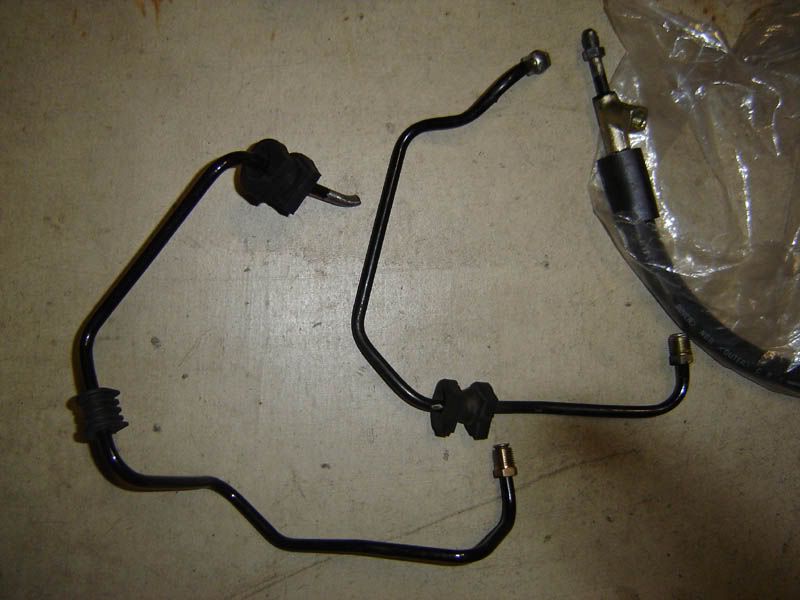
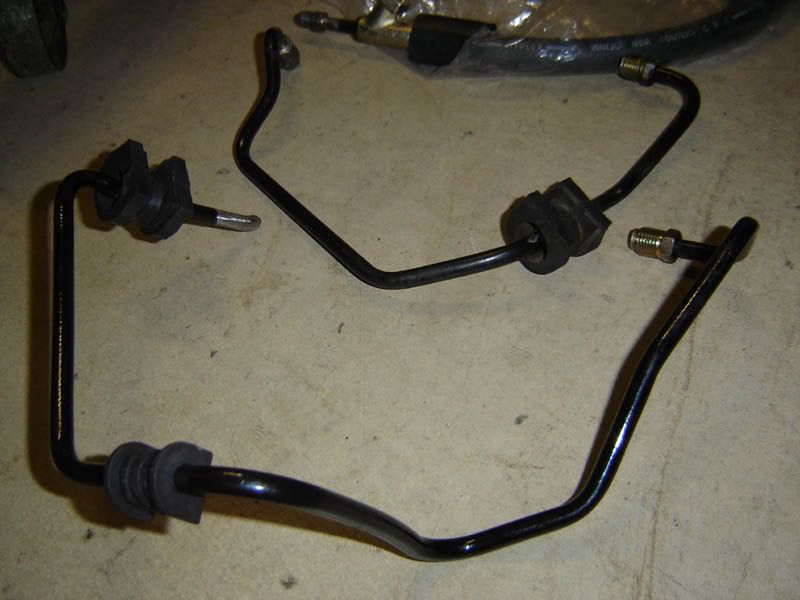
                        when i took off the accord line and compared it to the prelude line, the bends were very different. i read on other threads that you can just maneuver the lines to make it fit. in my case this couldn’t be possible. due to having the suspension techniques front sway bar, the new line wasn’t able to clear the movement of the beefier bar. my next move was to try and cut the two lines and couple the accord lower half to the prelude upper half. i see people braze the upper halves of the hoses but my motor didn’t come with enough hose to do so, and i had a new prelude line anyway. so i ended up cuting the lower half. here is the comparison of the two. the prelude line is on the left.


                        this closer shot shows the difference in the bends. the prelude line has more aggressive bends. on top of having another small rubber isolator, even the location of the main rubber isolator is different (it can be unglued and relocated anyway).


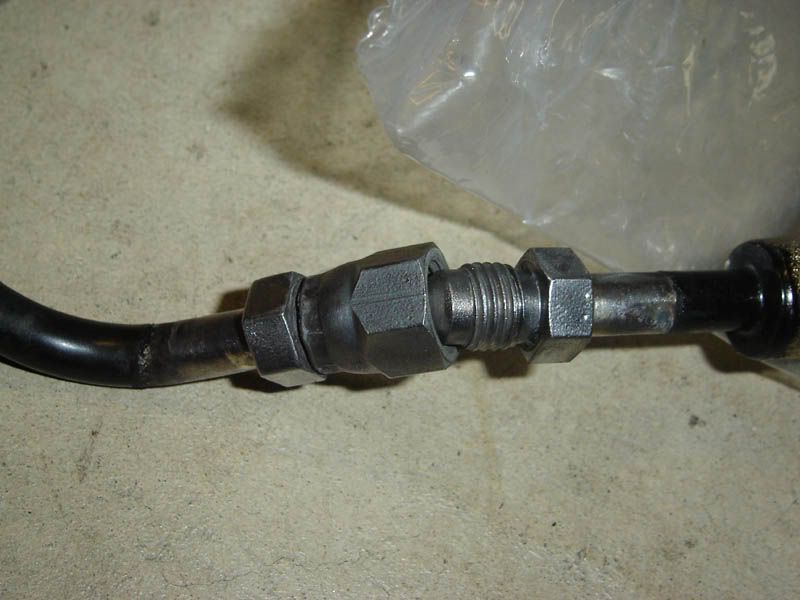
                        after it was cut, there were a few options to couple it: use flare fittings or braze it together. at first i tried to use 5/16” inverted flare fittings and a coupler but i didn’t give myself enough room on the line to get the fittings and flaring tool on the end. since that didn’t work at all next would be to weld it. the machine shop (http://www.pendarvismanufacturing.com) and i thought the line was aluminum so a special weld was necessary. the owner couldn’t guarantee a good clean couple so he referred me to a hose specialist; the hose-man (http://www.hose-man.com). specializing in hydraulic hoses they were able to couple the line. they also found out that the line was actually steel (using a magnet) and that no special welding was necessary.

                        there were able to put a fitting that can swivel to the right bend i needed to make it work in the engine bay. the fitting was similar to an inverted flare fitting too! i was very impressed by their work and professionalism. just take a look at the finished product. you can see how close to the bend and other fitting i cut the line, to the point where i couldn’t get the flare fittings to slide down all the way to get the flaring tool to work. anyway they made it work and i’m happy!


                        the high pressure line installed beautifully and without a hitch. since i was inside the engine bay i replaced the heater hoses. one thing i should have done was to use a knife to remove the old hoses instead of trying to pry them out with pliers. the heater core hose fitting are made of copper so they crush and bend very easily! i’ve heard civics are made of plastic so using pliers will permanently crack those fittings (ouch!). good thing i only deformed one side so i had to reform that fitting. i replaced all three hoses relating to the heater core with new ones: feed line, return line, and the small hose that goes into the mix valve (that connects to the heater knob on the climate control).

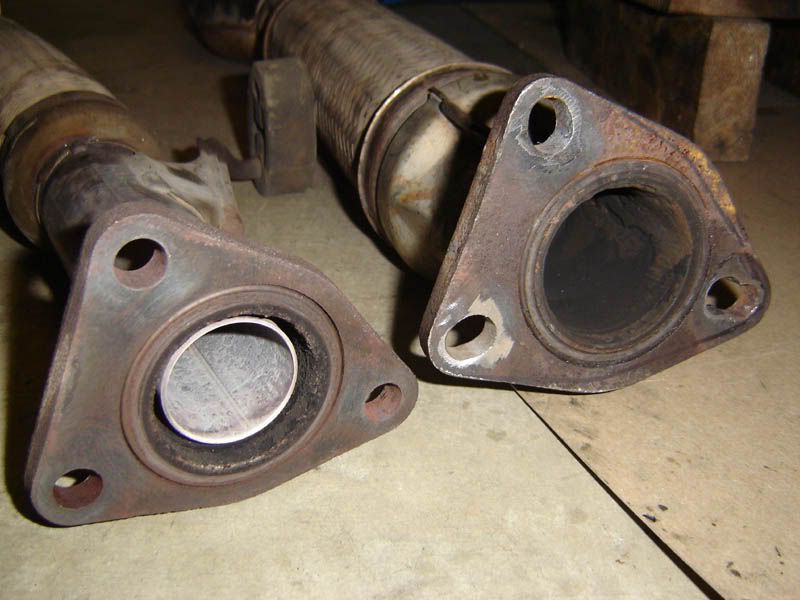
                        next problem to tackle was the downpipe. being japan-spec the flange connecting to the catalytic converter is slightly larger to accommodate for the larger opening. here is a comparison.


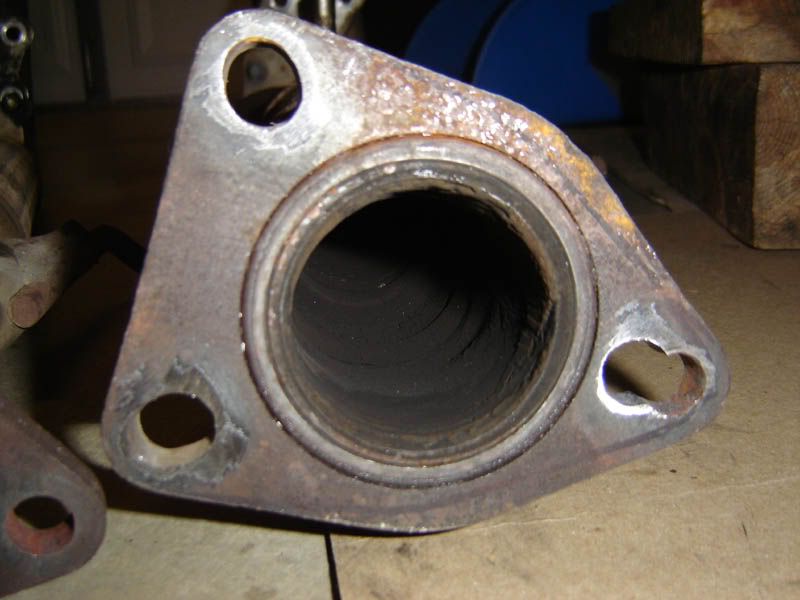
                        i wanted to use this downpipe and i didn’t want to cut and weld anything on the cat. so to make it work i decided to offset the flange holes on the downpipe. since i knew they did good work i went back to my machine shop to redrill the flange. i supplied them with a template of where to drill and wa-la. they used a plasma cutter and a finishing bit to cut the stubborn metal. check out the final outcome. i know the pipe diameters are off but it should work.


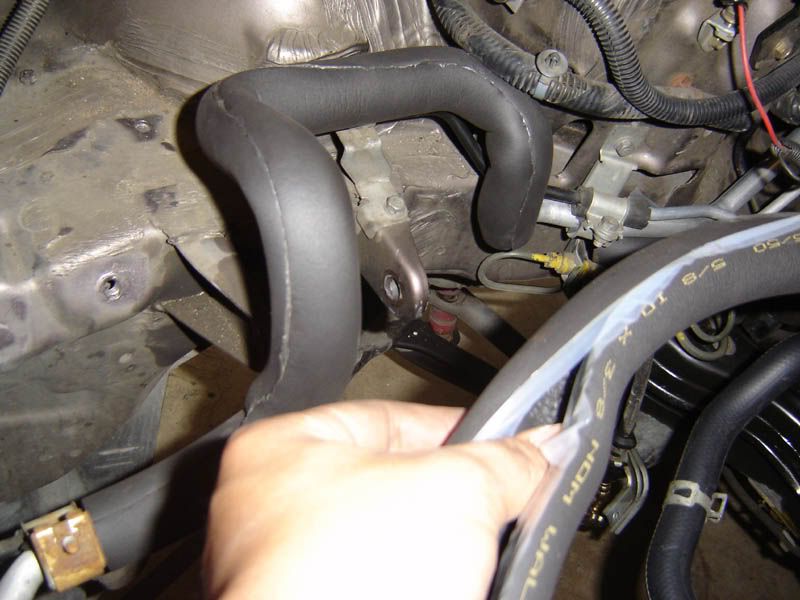
                        during the battery removal i noticed the insulation on one of the a/c lines has become brittle and is coming off. i addressed it here: http://www.cb7tuner.com/vbb/showthread.php?t=42589. i went to home depot to find a suitable replacement and found it in the plumbing department. the pipe insulation was of correct thickness, material, and diameter necessary to restore the line back to stock. it even had sticky tape to seal the insulation together. if you want the specs you can read it off the picture .


                        i saved wiring for last. there is a hole above the ecu where the factory uses to pass the wiring through the firewall for the foglights. i’ve already used this hole for my alarm and foglight wiring. i just enlarged the existing grommet to accommodate a special wire i’m going to use for the swap wiring. the special wire is just a computer cable (DB25) with twisted pairs of stranded wire inside. the grommet is right under the charcoal canister. you can see it here taken from the oem foglight installation instructions by fr0zen.
                        http://www.cb7tuner.com/vbb/attachme...ntid=673&stc=1

                        the wiring and reinstallation of the motor will conclude later.
                        1cor10:31
                        - 92 LX coupe
                        - 96 EX wagon (sold)

                        Comment


                          #42
                          after the first week, things went pretty smoothly. the weekend came and i was psyched to have more time with the motor. when i woke up friday morning, i was SUPER itchy all over. i had rashes and my skin was red like a tomato!

                          i thought maybe it was b/c i was using latex gloves and it was just a reaction but why all over my body?! shouldn't it be isolated on my hands?! it couldn't have been that since i was wearing latex gloves all week. why only now did i have a reaction?! hmm...

                          i looked further and narrowed it down. it was the COOLANT!!! i cleaned up a lot of it from when i removed the old motor. coolant is a super poison that actually penetrated my skin and went into my blood causing this horrible experience! the rashes didn't stop until sunday. i took benadryl too! there went my weekend! UNPRODUCTIVE! i was pissed...and itchy !

                          lesson: use thick rubber gloves when cleaning up coolant. besides it being able to kill pets by way of liver failure, it can penetrate the skin poisoning your blood .

                          ______________________

                          ok enough of this. time for another update to this journal. i hope you're finding this informative. it’s a new week and since the engine bay is ready, let's work on wiring the h22a now!

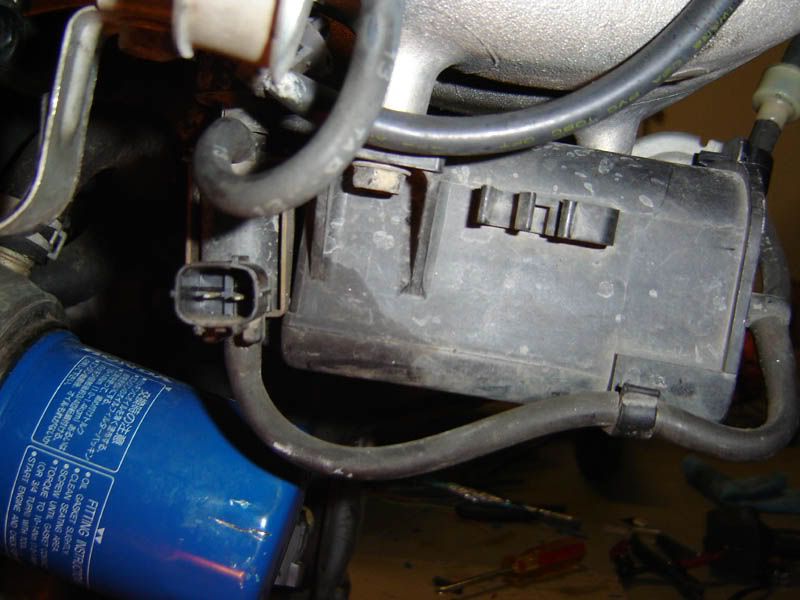
                          as with most jdm motors mine came with a busted IAB box and solenoid. lucky for me my buddy at 161822 found a replacement box however the solenoid plug is different and will not mate to the stock harness. this is the new IAB box and solenoid installed under the intake manifold.


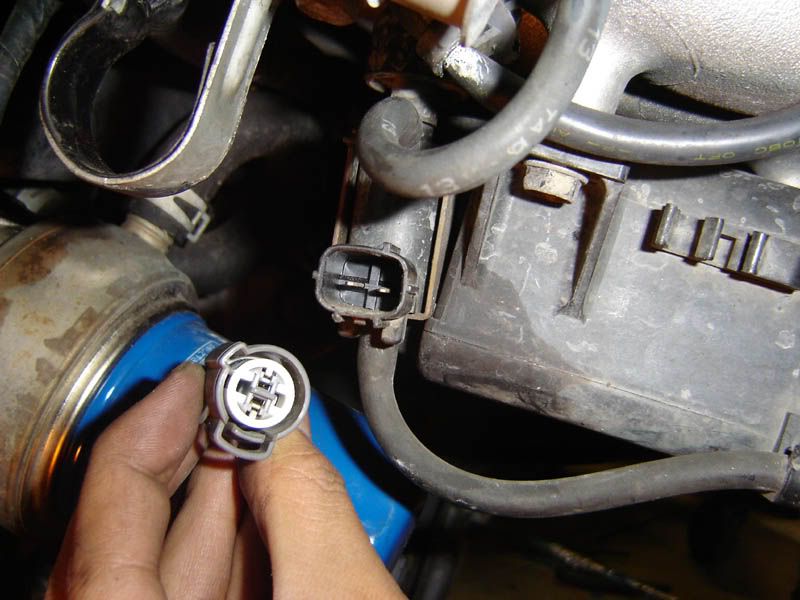
                          check out the different plug. also i had no clue on the pinout of the solenoid. i know it's a 50/50 but i'd rather get it right the first time .


                          i soon found out that it didn't really matter the pinout. it's just a coil inside the solenoid. so i got a matching plug from another harness off another motor (thanks to 161822) and prepped it. i will be making a sub-harness to include the IAB, knock sensor, vtec, and vtec pressure switch wiring.

                          for this sub-harness i simply used a DB25 computer cable and cut the connectors off. inside it has a few twisted pairs of 20awg stranded wires. since honda uses 16-18awg wires i needed to use two 20awg wires per one honda wire. there is plenty of wire inside the DB25 cable so this wasn’t a problem. i even quadrupled the knock sensor wiring because it had shielding over it.

                          here is the wiring breakdown:
                          -vtec oil pressure switch (2 wires)
                          -vtec solenoid (1 wire)
                          -knock sensor (1 wire w/grounded shielding like a coaxial cable)
                          -IAB solenoid (2 wires)

                          this totals to 6 wires i need to extend to the ecu. you can ground the vtec pressure switch in the engine bay (usually on the thermostat neck ground) but i chose to ground it on the ecu harness. you can also run the switched ignition wire for the IAB solenoid to a distributor wire but again i chose to run it to the ecu to be more neat and “factory”.

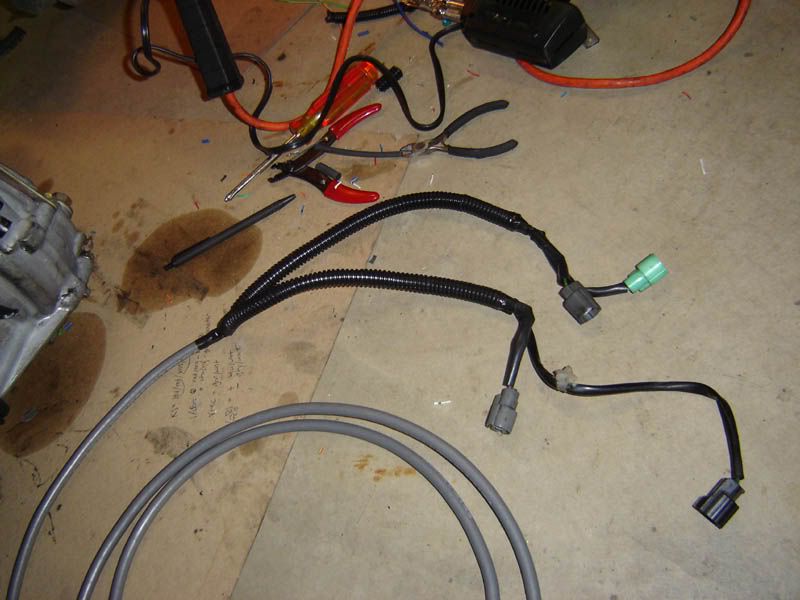
                          after some measuring, cutting, soldering, heat shrinking, electrical taping, and looming, my sub-harness is complete. the other end goes to through the firewall via access hole mentioned earlier then to the ecu harness. this is the final product. clockwise from the green connector: vtec oil pressure switch, IAB solenoid, knock sensor, and vtec solenoid.


                          as far as the rest of the motor harness, it just as simple as transferring over the accord harness to the h22a. i made sure not to break any plugs or wire ties on the accord harness. the hardest plugs to remove from the f22a1 was the oil pressure sensor and the water temp sensor for the gauge cluster. the rubber was so brittle i just broke in my hands. since i had an external coil i jammed a 30A fuse in the harness to jump the two wire together and wrapped it in electrical tape. i reused the accord EGR on the h22a to mate with the harness. getting that thing off was a pain too since i was only limited to hand tools .

                          well let me take that back! there was more work to be done for the wiring b/c my car is an LX. the o2 location is different so the wiring needed to be lengthened to the back of the motor. the wiring for the temp sensor on the thermostat neck needed to be extended as well as the oil pressure sensor. the h22a oil pressure sensor is below the oil filter where the f22a1 was above it. in some places it was a tight fit so i needed to stretch the wiring such as the harness for the alternator, but it was enough to reuse the wiring cover that goes over the valve cover. i never liked the look of the exposed harness snaking over the valve cover.

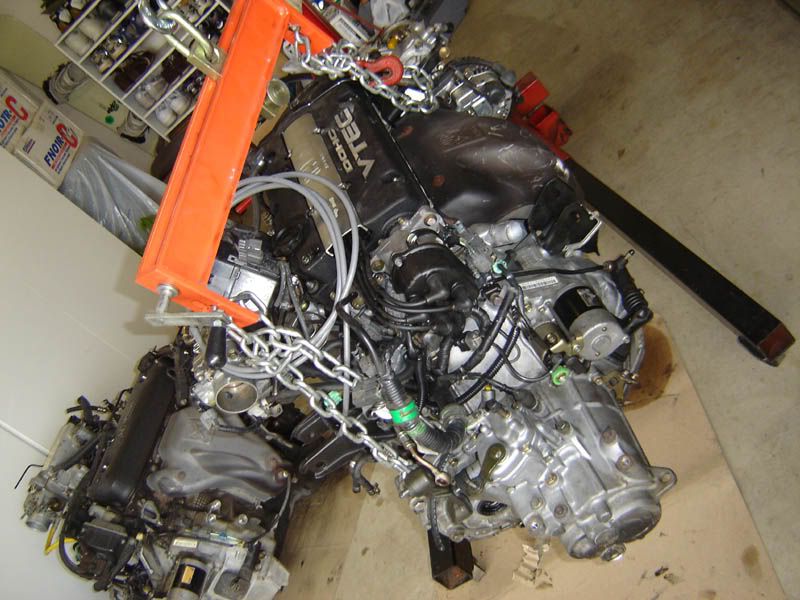
                          after all this, it’s just a matter of reusing the accord fuel rail, vacuum box, half shaft, front and rear mount brackets, h22a injectors, and bolting everything down, and the motor is all ready to be put back in. i almost forgot to transfer over the a/c compressor bracket. strap that baby to the hoist and get her ready.


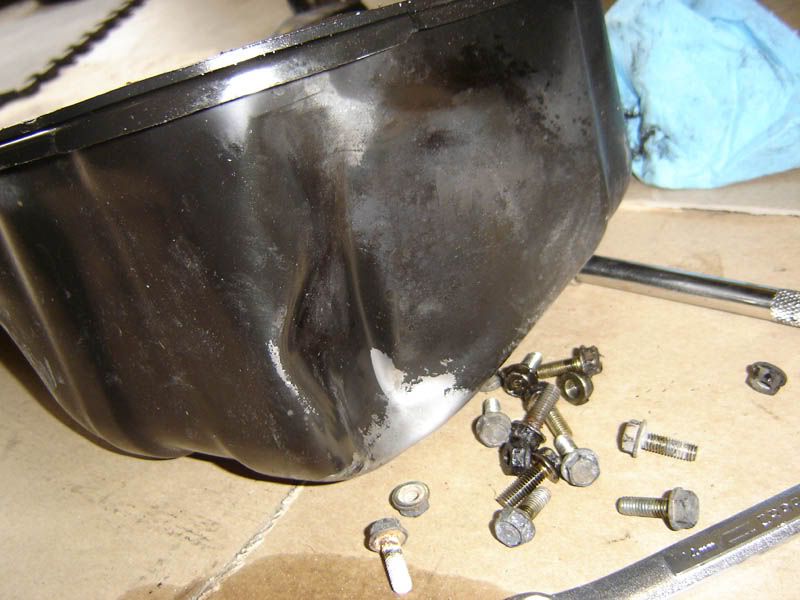
                          i got the motor off the ground and i notice the huge dent that i forgot to address on the oil pan. it was HUGE but there were no scratches?! i removed the pan.


                          after closer inspection i found the oil pickup to have a dent too ! what the heck happened? this could be why i got the motor for a cheaper price than usual.
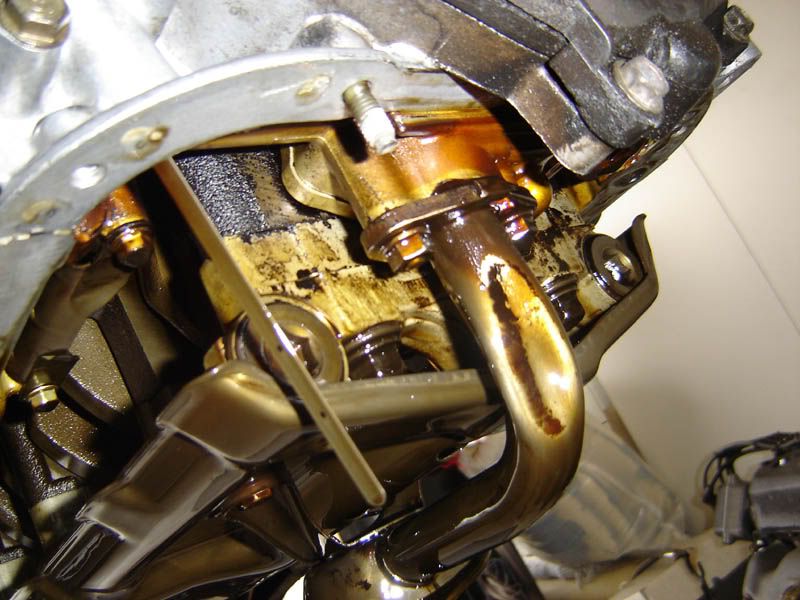

                          good thing the f22a1 oil pan works on the h22a and the oil pick up is exactly the same on both motors. since i only had one hoist i kept the h22a pan on the motor in plans to swap the two pans when the h22a is already bolted on the chassis. this also gave me time to get the gasket and hondabond.

                          for now let’s get this motor in!

                          before reinstallation i had to install the rear motor mount insert. it fit but not perfectly. i needed to use a c-clamp to hold the insert together inside the mount b/c the bracket isn’t wide enough to go over. i used lithium grease to coat the insert prior to installation. i’ve heard that the insert can squeak overtime if not done.

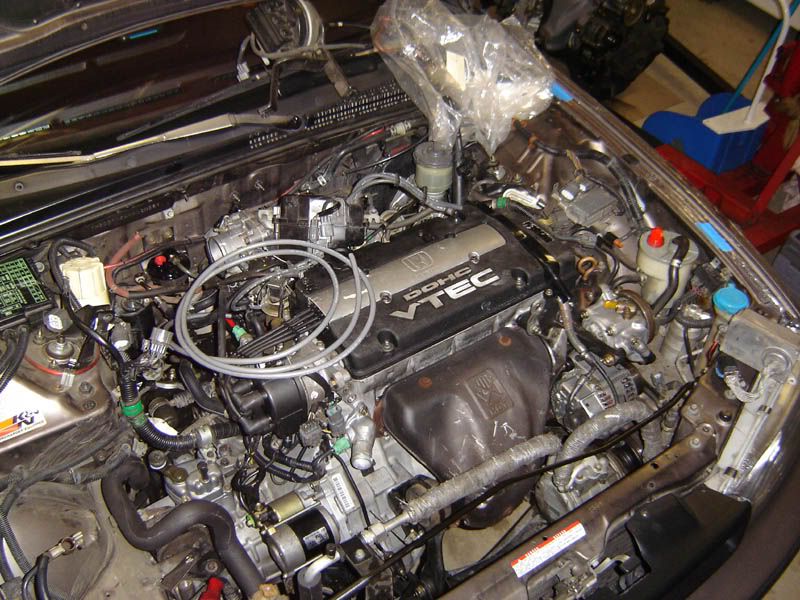
                          reinstallation is the same as removal. having the crank pulley removed really gives you a lot more clearance. the hardest part of this job was checking and double checking the clearance between the TPS and the firewall, the pass side mount and tranny, as well as the a/c compressor to the bracket. i watched for the a/c lines to the slave cylinder clearance and actually removed the TPS just to be sure. it was necessary to push down on the rear mount bracket to clear the motor mount insert. i used a metal rod and a 5lb hammer to pound down while the c-clamp held the inserts together on the mount. thank God it lined up perfectly and i was able to return the bolt with little effort.


                          after about 30mins of maneuvering and pounding on the rear motor mount bracket the motor was finally bolted down in place. woo hoo but there is so much more to do!


                          it’s finally in but there is still more to come!
                          1cor10:31
                          - 92 LX coupe
                          - 96 EX wagon (sold)

                          Comment


                            #43
                            wow that is beautifully clean. good job!


                            - 1993 Accord LX - White sedan (sold)
                            - 1993 Accord EX - White sedan (wrecked)
                            - 1991 Accord EX - White sedan (sold)
                            - 1990 Accord EX - Grey sedan (sold)
                            - 1993 Accord EX - White sedan (sold)
                            - 1992 Accord EX - White coupe (sold)
                            - 1993 Accord EX - Grey coupe (stolen)
                            - 1993 Accord SE - Gold coupe (sold)
                            Current cars:
                            - 2005 Subaru Legacy GT Wagon - Daily driver
                            - 2004 Chevrolet Express AWD - Camper conversion

                            Comment


                              #44
                              nice sig mike hahaha!
                              1cor10:31
                              - 92 LX coupe
                              - 96 EX wagon (sold)

                              Comment


                                #45
                                that motor looks hella clean, nice buy!

                                Comment

                                Working...
                                X