Thanks Sonic! It's always cool to end up actually bringing some of the new tech to our old cars.
Announcement
Collapse
No announcement yet.
Rilas : 1993 Accord SE
Collapse
X
-
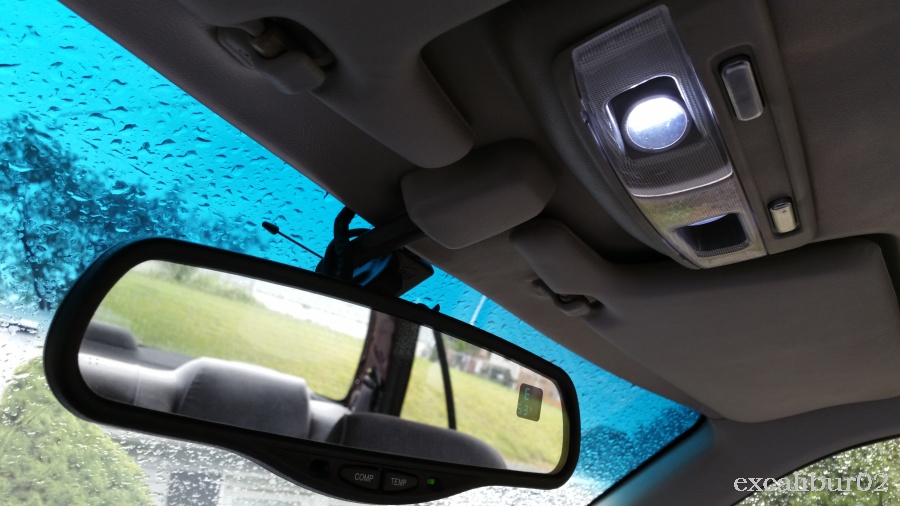
So here is the final result of the Accord/TL bracket and how it mounts in the car. I have a touch more work to do. Mainly with my plastic covers. Also wiring it in, but I'm not taking the headliner out quite yet.
Accord/TL Automatic Rear View Mirror 1

Accord/TL Automatic Rear View Mirror 2

Accord/TL Automatic Rear View Mirror 3 (So once I wire this in, it will go through the headliner above the Acura TL rear view mirror plastic cover. This will make it invisible to anyone.)

I'm happy with the turnout of this mod so far. I'll be stoked once it's finally wired in.
Also I dropped off the Clutch Masters pressure plate and clutch today. I'll list it's model number later.
Comment
-
Yes for the auto dimming to work it just needs ground and 12v. The third wire turns off the auto dimming when in reverse. I'm not sure where this would be wired to. I would imagine the reverse signal for the backup lights from the transmission.Originally posted by Mike1357 View PostDoes the mirror just need power and ground for the auto dimming to function?
Comment
-
Well a quick update. I do have a bit more of an update but since photobucket is under maintenance, I'll keep this short. On Wednesday my new H22A1 Supertech valve springs showed up in the mail. Yesterday I dropped them off at the machine shop. While I was there I got to look at the reground rocker arms. They look fantastic now! So this project is still waiting for the crank pulley, and the balancer shaft delete kit. I'm going to buy a single row F20B crank pulley from HMotorsonline.com. Then the rotating assembly can get balanced. After that I get to bring it home, and play mechanic for awhile with it.
Comment
-
Thanks for the compliment SPLCB7! Hopefully I can inspire some others.Originally posted by SPLCB7 View PostThis is nice i like the idea with the mirrors
Comment
-
Since the insulation project got held up on some funding. I've partially started that project. Mainly the garage got reorganized and cleaned up. Then everything came out of the attic and ended up in a small mountain sized pile. I was still able to get Lola back into the garage although with some limited space. So I did the mirror modification, then moved on to another project I've had laying around for about 2 years.
Legend Hood Dampers 1 (On each side there is a locking nut welded onto the backside of the hood hinge. This should hopefully prevent these from ever breaking like other members have had happen.)

Legend Hood Dampers 2

Legend Hood Dampers 3

This past weekend I finally wrapped up all of this project and got all my body lines nice again. What a pain in the ass it is to take the entire face off the car again... For a simple small project. (Raf I feel your pain, with your intercooler and piping.) I had to do some trimming on the fenders water runoff channels. If I keep these hood dampers I will fix this and make the channels work again. I might end up trading these out for the Tein hood dampers instead. If so I will just replace the fenders and get the water run off channels back. With the trimming of the channels I was able to get the dampers not to interfere with the hood anymore. So now the hood line matches the fender line. I've seen members pictures where this was not fixed and there is a hump in the hood, I could not accept that.
No updates on the H22A1 for the time being. Just waiting for payday to order the crank pulley and the KS balancer shaft delete kit.
Comment
-
Here is what I could get without taking the car all back apart.Originally posted by cb9love View Postcan we get a few close ups of your hood dampener install?
that is also one of the little projects I would like to do to my car.
Hood Damper Install 1 (I wanted my dampers located over the middle bolt in the fenders. I'm not sure why but I decided this was a good location for this to be anchored.)

Hood Damper Install 2 (To achieve the placement centered on the middle bolt hole in the fender I had to modify the dampers by cutting out the hump in the mounting bracket. Here is what I took out.)

Hood Damper Install 3

Hood Damper Install 4 (The rear bolt hole, furthest towards the cabin, goes through 2 layers of sheet metal. I just drilled and tapped this. The front hole though only has 1 layer of sheet metal. So I installed a M6x1.00 nutsert. It's barely visible in the blurry picture. I also had to grind about 3/4 of the bolt heads off, so they would not interfere with the fender.)

Hood Damper Install 5 (So you can see in the water runoff channels that I had to do quite a bit of trimming to get the dampers to not lay down on the channels when the hood was closed.)

Hood Damper Install 6 (The last notch up at the top is for the head of the damper where it is installed into the hinge. Thats where it rests when the hood is closed. I really should just trim off the middle chuck sticking out to make it more uniform. If I keep these dampers and fenders, I'm going to add a small lip to the fender channels to keep the water in. Then on the hood add a small piece of triangular rubber or weather stripping to keep the water in the fender channels, so I won't have water all over the engine bay that the fenders should have caught.)

Hood Damper Install Final Product

I hope this helps some CB9Love. Because I spend hours working on this stupid install that should have only taken an hour or two tops. I'm not sure how many times I refitted the fenders on the body.
By the way I love your signature!Last edited by Rilas; 02-03-2016, 02:34 PM.
Comment


Comment