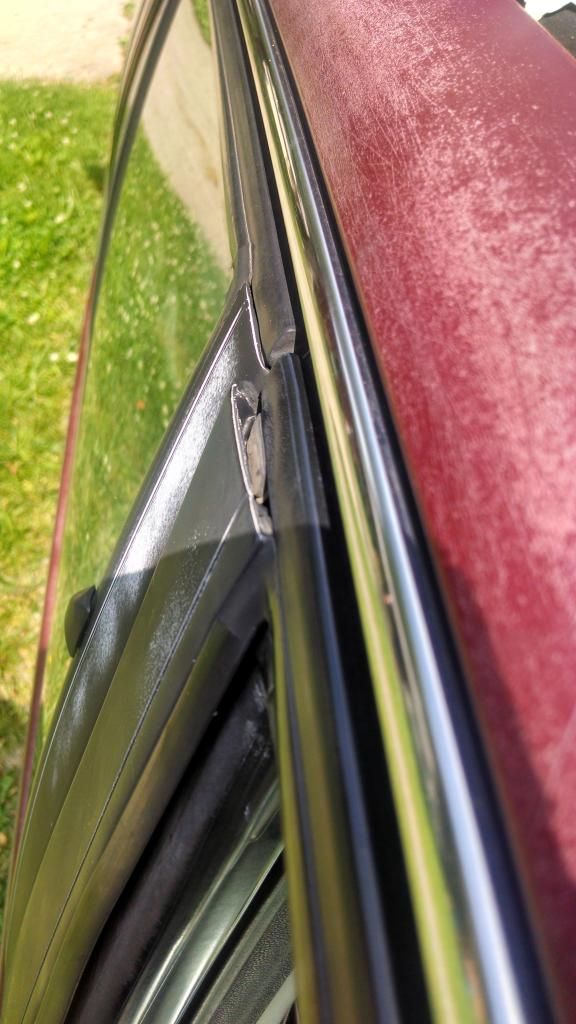
This always bugged me. Even other people tend to notice it, which really means it is noticeable. So i went about looking into it... Lo and behold, it is really very simple to fix. That gap between the B-pillar (I stand corrected) cover on the front doors and the actual door.
Tools:
- 2PH Phillips (Cross slot) screwdriver.
- Rubber razor blade (optional).
- Triceps :P

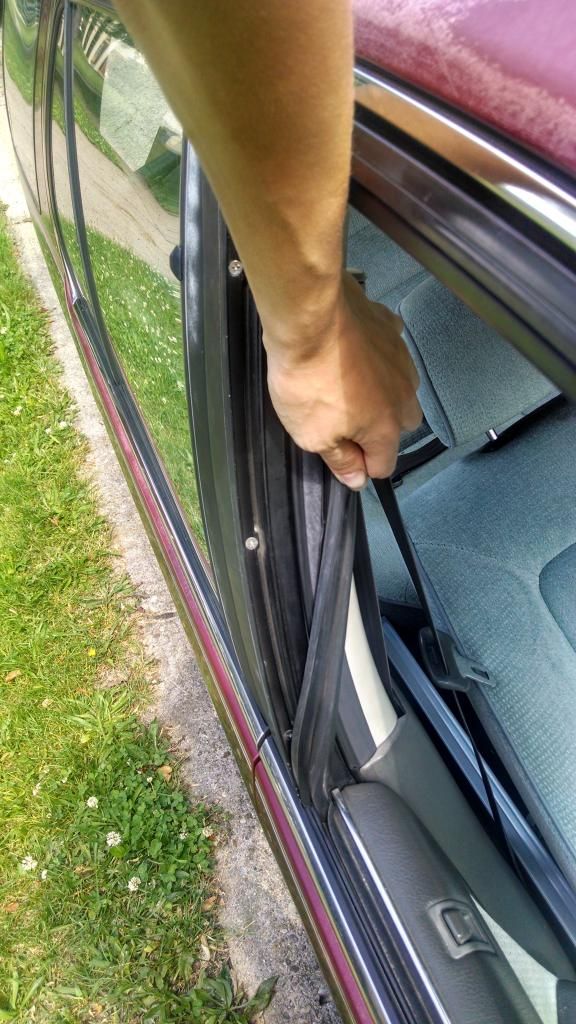
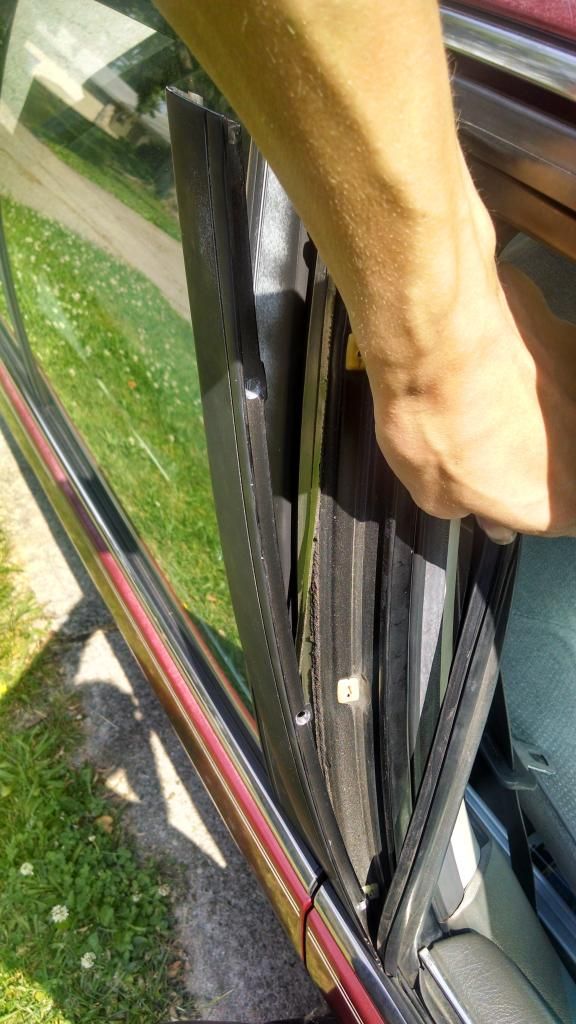
I suggest putting the window down but leaving the door closed, as it gives a bit more stability to your work. Then simply pull ONLY the side part of weatherstripping away from the door until you reveal the three screws that hold it in place. WARNING: If you remove the upper portion of the weatherstripping, it is a royal pain to properly reinstall, but I will cover that later.

Once the screws are removed, and for the love of God, do not drop them... It can be a nightmare the get them out of the door if they should go down into it. But anyways... Once they are removed, simply pull gently out on the top and then up on the entire piece.

At this point, I recommend using the rubber razor blade, so as not to damage any paint, to remove the old weatherstripping between the cover and the door. You can purchase A/C insulating foam made for indoor/outdoor use at most local hardware stores.
Now it really is as simple as rubbing your hands together (to build suspense), grabbing each end of the cover, and GENTLY bending it over your leg. Now... Those of you that may want to get a bit more technical, you can honestly go to more extensive measures and calculate the distance between each point, the curvature, yada yada... But I've seen most of your cars. ;P If it works by doing it the easy way and you achieve the same end result, why be more complicated. Back on point... Keep in mind, if you bend it too far that you can damage it, but you can bend it back if necessary. Just go little by little. Another thing to keep in mind is that you will want to bend the rearmost upper corner more than the frontmost. The base of the trim is held down by the door. The inside edge, by the screws. That point is the weakest point of the cover. And if you want to while you are at it, wrap them, paint them, do whatever you fancy.
Now let's say you were oh so unfortunate as to pull the upper portion of the rubber seal out like I was... It's not fun. I suggest opening the door and starting by pushing (from the rear of the car forward) on the weatherstripping. It is really fitted in there. Then you hook it up, over and down, as if you were hanging a clothes hangar and push in the center. It may not make sense until you have to try it. Once you get the technique of holding the it pinched so it doesnt decompress back while putting it back in, you will be dandy. But let us just try to avoid having to do this, shall we?
The whole process is really quite simple, and it goes back together even more simply than it came apart. My only last suggestion is that you start with the bottom screw on the B-pillar cover. Have fun! I sure did... -__-
http://i600.photobucket.com/albums/t...psd8b2d80a.jpg
Not perfect, but I was more focused on the tutorial. I'll go back and do it some more later.
Tools:
- 2PH Phillips (Cross slot) screwdriver.
- Rubber razor blade (optional).
- Triceps :P

I suggest putting the window down but leaving the door closed, as it gives a bit more stability to your work. Then simply pull ONLY the side part of weatherstripping away from the door until you reveal the three screws that hold it in place. WARNING: If you remove the upper portion of the weatherstripping, it is a royal pain to properly reinstall, but I will cover that later.

Once the screws are removed, and for the love of God, do not drop them... It can be a nightmare the get them out of the door if they should go down into it. But anyways... Once they are removed, simply pull gently out on the top and then up on the entire piece.

At this point, I recommend using the rubber razor blade, so as not to damage any paint, to remove the old weatherstripping between the cover and the door. You can purchase A/C insulating foam made for indoor/outdoor use at most local hardware stores.
Now it really is as simple as rubbing your hands together (to build suspense), grabbing each end of the cover, and GENTLY bending it over your leg. Now... Those of you that may want to get a bit more technical, you can honestly go to more extensive measures and calculate the distance between each point, the curvature, yada yada... But I've seen most of your cars. ;P If it works by doing it the easy way and you achieve the same end result, why be more complicated. Back on point... Keep in mind, if you bend it too far that you can damage it, but you can bend it back if necessary. Just go little by little. Another thing to keep in mind is that you will want to bend the rearmost upper corner more than the frontmost. The base of the trim is held down by the door. The inside edge, by the screws. That point is the weakest point of the cover. And if you want to while you are at it, wrap them, paint them, do whatever you fancy.
Now let's say you were oh so unfortunate as to pull the upper portion of the rubber seal out like I was... It's not fun. I suggest opening the door and starting by pushing (from the rear of the car forward) on the weatherstripping. It is really fitted in there. Then you hook it up, over and down, as if you were hanging a clothes hangar and push in the center. It may not make sense until you have to try it. Once you get the technique of holding the it pinched so it doesnt decompress back while putting it back in, you will be dandy. But let us just try to avoid having to do this, shall we?
The whole process is really quite simple, and it goes back together even more simply than it came apart. My only last suggestion is that you start with the bottom screw on the B-pillar cover. Have fun! I sure did... -__-
http://i600.photobucket.com/albums/t...psd8b2d80a.jpg
Not perfect, but I was more focused on the tutorial. I'll go back and do it some more later.


 Did this over the weekend but didn't know how to get it off.
Comment