This install is only for 90-91 Accords with internal coils and just for the coil and ballast resistor. No aftermarket ignition was used. If you are using one you would simply not use a ballast resistor and connect the coil through the ignition box. This is a simple project and MSD has instructions for almost every step, if you do indeed buy an MSD product. And why wouldn't you.
MSD pdf instructions:
Modified Cap #8292
Blaster SS
Blaster 2
Parts needed:
Coil - I think the SS is easier to find a place to mount and it includes vibration mounts. But it does not come with the ballast resistor. The Blaster 2 comes with a resistor and you can get it in chrome.
Wire strippers
Needle nose pliers
Wire - 14ga is good, 2 different colors if you want
Soldering gun and solder
Couple connections for the 14ga wire to the coil and ballast resistor
Eletrical tape or heat shrink
Screwdrivers
Bracket for Blaster 2 coil, and a few screws or bolts to mount to car
New Rotor and Dust Cover if you so choose since you'll be pulling both anyways.
And we're off:
Follow the instructions from MSD. And your Honda manual if you need it. Don't forget which cylinder those spark plug wires ran to! And disconnect the battery!
You'll be taking off 3 phillips head screws holding the cap down. The third is really hard to get to if you have big hands or little patience.
Here's what an old cap can look like. Notice the corrosion on the metal points.

Now you need to pull off the rotor. It may really be stuck on like mine was. Oh well, that's why we invented tools, to bust shit up. Hit it with a screwdriver and hammer if need be. Then take off the dust cover.
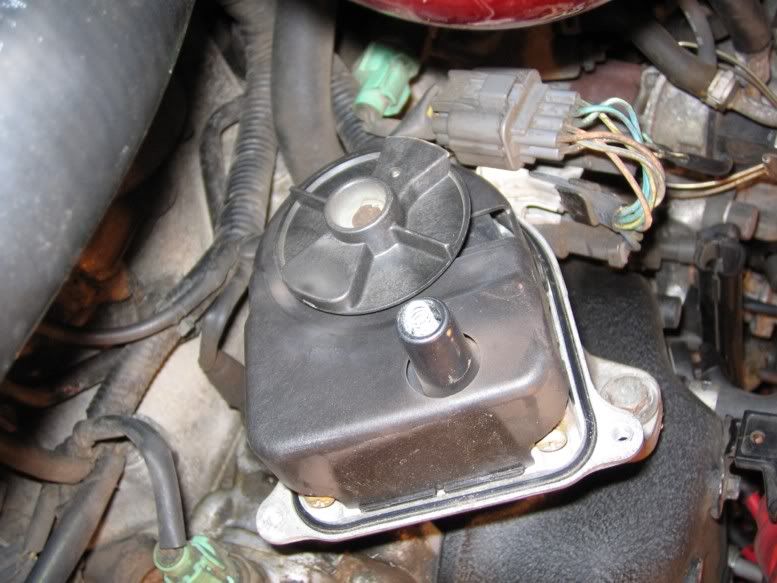
Then you will remove the coil, which is the black box with the thing that stuck out through the dust cover. These screws might be on hard too. Try not to strip them. The coil itself should have markings + and - Note which wires went where. You're just gonna extend these out of the distributor cap to the resistor and coil. I really couldn't tell the colors. They all looked black or dark green with a yellow stripe. So cut off the connections at the end of these wires and solder on some new wire and leave enough length(2 feet or so) It's a tight space to solder stuff, esp. if you've never soldered stuff before. Picture of coil removed and new extended wires soldered on:

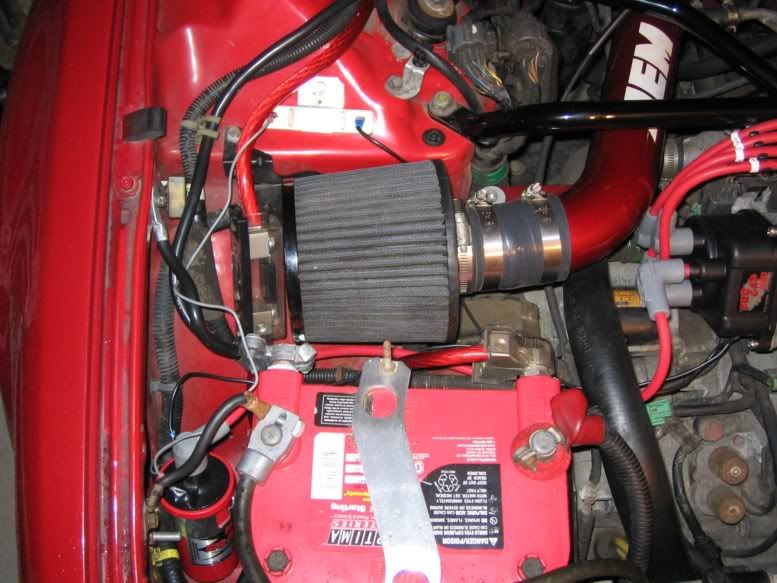
Put the dust cover and (new) rotor back on. Now you can drill a little hole in the cap like I did or possibly run them between the cap gasket. Put the cap on. If you're not using an MSD Igniton decide where you want the resistor and coil to go. Run the + wire to the resistor. And then the other end of the resistor to the + on the coil. Then run the - wire to the - marked on the coil. You will need to cut the coil wire and crimp on a terminal to the wire that should have been included with your cap. Note: this is a pain in the ass. Connect coil to red tower on cap and you're done.
MSD pdf instructions:
Modified Cap #8292
Blaster SS
Blaster 2
Parts needed:
Coil - I think the SS is easier to find a place to mount and it includes vibration mounts. But it does not come with the ballast resistor. The Blaster 2 comes with a resistor and you can get it in chrome.
Wire strippers
Needle nose pliers
Wire - 14ga is good, 2 different colors if you want
Soldering gun and solder
Couple connections for the 14ga wire to the coil and ballast resistor
Eletrical tape or heat shrink
Screwdrivers
Bracket for Blaster 2 coil, and a few screws or bolts to mount to car
New Rotor and Dust Cover if you so choose since you'll be pulling both anyways.
And we're off:
Follow the instructions from MSD. And your Honda manual if you need it. Don't forget which cylinder those spark plug wires ran to! And disconnect the battery!
You'll be taking off 3 phillips head screws holding the cap down. The third is really hard to get to if you have big hands or little patience.
Here's what an old cap can look like. Notice the corrosion on the metal points.

Now you need to pull off the rotor. It may really be stuck on like mine was. Oh well, that's why we invented tools, to bust shit up. Hit it with a screwdriver and hammer if need be. Then take off the dust cover.

Then you will remove the coil, which is the black box with the thing that stuck out through the dust cover. These screws might be on hard too. Try not to strip them. The coil itself should have markings + and - Note which wires went where. You're just gonna extend these out of the distributor cap to the resistor and coil. I really couldn't tell the colors. They all looked black or dark green with a yellow stripe. So cut off the connections at the end of these wires and solder on some new wire and leave enough length(2 feet or so) It's a tight space to solder stuff, esp. if you've never soldered stuff before. Picture of coil removed and new extended wires soldered on:

Put the dust cover and (new) rotor back on. Now you can drill a little hole in the cap like I did or possibly run them between the cap gasket. Put the cap on. If you're not using an MSD Igniton decide where you want the resistor and coil to go. Run the + wire to the resistor. And then the other end of the resistor to the + on the coil. Then run the - wire to the - marked on the coil. You will need to cut the coil wire and crimp on a terminal to the wire that should have been included with your cap. Note: this is a pain in the ass. Connect coil to red tower on cap and you're done.




Comment