
Fast Idle Thermo Valve (FITV) Repair:
This assumes the FITV has already been removed from the intake plenum. It is mounted with 10 mm hex head screws.
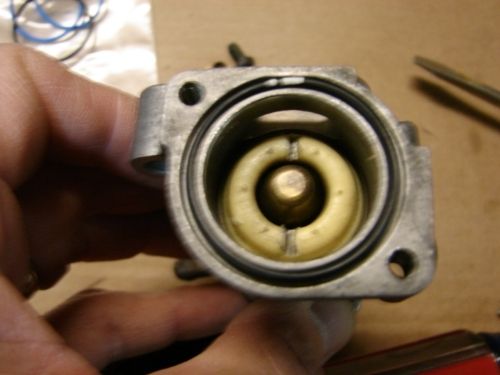
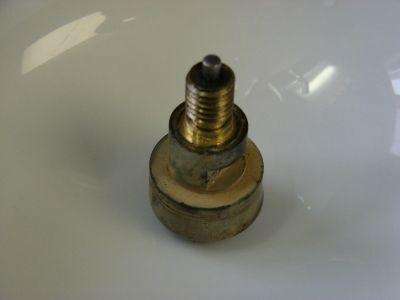
The valve operates on engine vacuum. The bottom of the spring loaded plunger rests on the top of the thermal valve plunger. The adjustable piston (pale yellow part) controls the spring preload of the plunger on the underside of the adjustable piston. High engine vacuum during a start pulls the plunger down, admitting extra air to the engine. As the engine coolant temperature increases, the thermal valve extends, increasing the preload on the spring to the point that it overcomes engine vacuum and closes the valve.
Cranking the adjustable piston all the way down solves the surging idle problem (but negatively affects the cold start idle) by clamping the piston down against the yellow ring of the poppet assembly, stopping the air leak around the piston.
NOTE: To solve the typical surging idle problem, all you really need to do is replace the piston and cover o-ring; this can be done with the FITV installed on the intake plenum.
Tools:
Phillips screwdriver
Supplies:
- Size 2-026 o-ring for the top cover
- Size 2-019 o-ring for the adjustable piston
- Size 2-018 o-ring can be used in place of the oval seal between the valve and the intake plenum
- Size 2-016 o-ring can be used in place of the round seal between the valve and the intake plenum
Note: These four o-rings can be almost any material as they only come in contact with air. I suspect the original o-rings are something like a nitrile that takes quite a compression set over time at temperature.
If for some reason you need to remove the lower (engine coolant) section, these two should be ethylene propylene to be compatible with anti-freeze.
- Size 2-024 o-ring for the outside seal
- Size 2-011 o-ring between the heat valve and the FATV body.
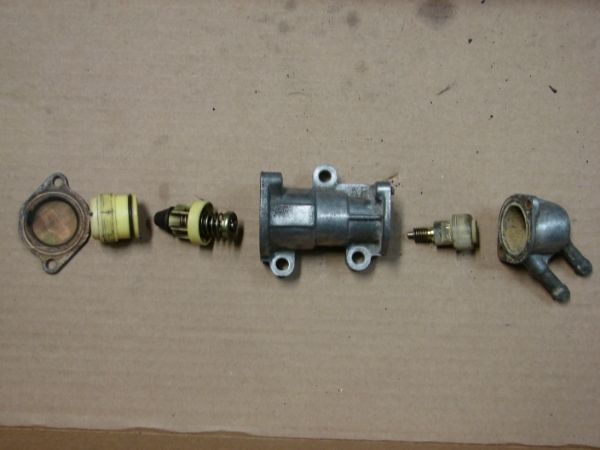
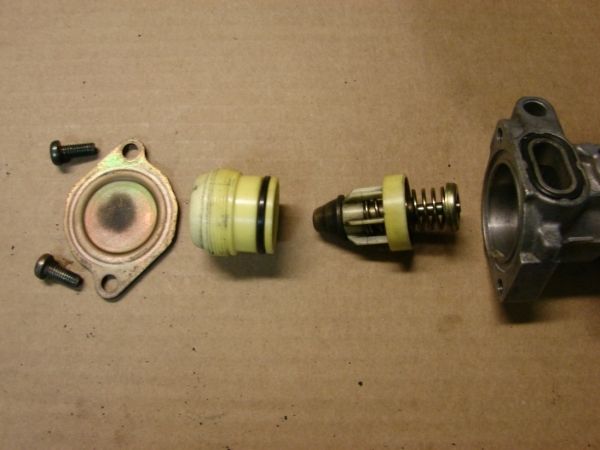
Remove the top cover of the valve by removing the two screws.
Remove and discard the o-ring
Using a flat bladed screwdriver, unscrew the piston from the valve body.
Remove the o-ring from the piston. It may feel more like hard plastic than rubber and may actually fracture instead of stretching. I believe this is the problem; it has taken a complete (100%) compression set such that it no longer seals and allows leakage past the piston even at high coolant temperatures.
Pull the plunger assembly out and make sure it is clean and works smoothly.
I removed the lower section and removed the thermal actuator. I tested it by placing it in a bowl of boiling water. The small plunger will extend about a quarter inch. It can also be tested without disassembling the lower section by pouring boiling water into the port and observing that the plunger extends.

Assembly is the reverse of disassembly.
Install the 2-019 o-ring on the piston. Use small amount of spray lubricant on the sealing surface in the valve body, then thread the piston into the body. I turned the piston all the way down, then backed it out 2.5 turns.
Install the 2-026 o-ring on the top of the valve, then install the cover with two screws.
Install the 2-018 o-ring in the oval groove on the valve face.
Install the 2-016 o-ring in the round groove on the valve face.
I will update this when I install it on a car.
This assumes the FITV has already been removed from the intake plenum. It is mounted with 10 mm hex head screws.
The valve operates on engine vacuum. The bottom of the spring loaded plunger rests on the top of the thermal valve plunger. The adjustable piston (pale yellow part) controls the spring preload of the plunger on the underside of the adjustable piston. High engine vacuum during a start pulls the plunger down, admitting extra air to the engine. As the engine coolant temperature increases, the thermal valve extends, increasing the preload on the spring to the point that it overcomes engine vacuum and closes the valve.
Cranking the adjustable piston all the way down solves the surging idle problem (but negatively affects the cold start idle) by clamping the piston down against the yellow ring of the poppet assembly, stopping the air leak around the piston.
NOTE: To solve the typical surging idle problem, all you really need to do is replace the piston and cover o-ring; this can be done with the FITV installed on the intake plenum.
Tools:
Phillips screwdriver
Supplies:
- Size 2-026 o-ring for the top cover
- Size 2-019 o-ring for the adjustable piston
- Size 2-018 o-ring can be used in place of the oval seal between the valve and the intake plenum
- Size 2-016 o-ring can be used in place of the round seal between the valve and the intake plenum
Note: These four o-rings can be almost any material as they only come in contact with air. I suspect the original o-rings are something like a nitrile that takes quite a compression set over time at temperature.
If for some reason you need to remove the lower (engine coolant) section, these two should be ethylene propylene to be compatible with anti-freeze.
- Size 2-024 o-ring for the outside seal
- Size 2-011 o-ring between the heat valve and the FATV body.


Remove the top cover of the valve by removing the two screws.
Remove and discard the o-ring
Using a flat bladed screwdriver, unscrew the piston from the valve body.

Remove the o-ring from the piston. It may feel more like hard plastic than rubber and may actually fracture instead of stretching. I believe this is the problem; it has taken a complete (100%) compression set such that it no longer seals and allows leakage past the piston even at high coolant temperatures.

Pull the plunger assembly out and make sure it is clean and works smoothly.
I removed the lower section and removed the thermal actuator. I tested it by placing it in a bowl of boiling water. The small plunger will extend about a quarter inch. It can also be tested without disassembling the lower section by pouring boiling water into the port and observing that the plunger extends.


Assembly is the reverse of disassembly.
Install the 2-019 o-ring on the piston. Use small amount of spray lubricant on the sealing surface in the valve body, then thread the piston into the body. I turned the piston all the way down, then backed it out 2.5 turns.
Install the 2-026 o-ring on the top of the valve, then install the cover with two screws.
Install the 2-018 o-ring in the oval groove on the valve face.
Install the 2-016 o-ring in the round groove on the valve face.
I will update this when I install it on a car.


Comment