Announcement

Collapse
No announcement yet.

INT: Footwell Lights

Collapse
X
 
  • Filter
  • Time
  • Show
Clear All
new posts

    INT: Footwell Lights

    Easiest method of Interior Footwell lights

    This was pretty much the first "mod" I did on my car and it's one of my favorite. It gives the inside of the car a completely different feel at night. I've looked around at other's lights and setups and I still feel that mine is the simplest so this is what I'll go with.


    Tools and Parts needed
    Wire stripper - Most Wire strippers have a cutter and crimper on there. You'll need those as well if your Wire stripper doesn't have those on it.
    Inline fuse - I bought mine at Walmart, I'm sure you can find them at Autozone - Image
    2 amp fuse - Fuse to put into the inline fuse slot.
    Switch - Also bought this at Walmart for $1.25. You can also get 'em at Autozone for like $8.00 - Image
    Wire Couplers - Like $6.00 at Walmart for 40 of them. Make sure they'll fit the gauge of wire you get. - Image
    Wire connector caps - Used to connect 2 wires that are too big for the couplers. You'll only need 4 or so of these. - Image
    Wire to plug Adapter - You'll need a few of these. You can get these at the same place as Wire couplers. I'm sure this has some better name, but refer to the picture to see what I mean. - Image
    Something to mount with - You'll need something to keep the lights mounted where you want them. You could use metal U shaped brackets, but I personally just use Gorilla tape. I don't like drilling holes in my car and I have yet to have the gorilla tape let go of my lights. Whichever route you want to take is up to you.
    40 ft of wire - $6.00 or so from Walmart. I used 16 gauge Wire I believe. There's no way you'll use 40 ft but It's always better to have more than less. Plus it's pretty cheap.
    LED Footwell lights - These are the ones I use. I like them because they throw enough light for it to be fun, but not to the point where it's distracting while driving or noticable to the police car right next to you at a stop light. https://www.euroeffects.net/4-43-_LE...Tubes_2x6.html I use the 2x6 ones. If you want the 2x9 ones they're the same price you can order them right off that same website.
    Last edited by Ander; 02-08-2012, 03:02 PM.


    Member's Ride Thread

    Originally posted by mercyboy
    I'd rather lose by a mile because I built my own car then win by an inch because someone else built it for me..your car is your story, so don't let someone else write the book!

    #2
    Installation
    If you're using the EuroEFX LEDs I posted above, there are two installations.

    Installation 1.) [Easiest] - The lights I posted above come with everything you'd need to install this way. You wont need to purchase anything I posted in the parts list aside from the lights themselves and something to mount with. The lights come pre-wired to a cigarette lighter adapter. Therefore all you have to do is plug in the cigarette lighter adapter, mount the lights somewhere and conceal the wires(wire conceal is shown on installation 2.) The cigarette adapter has an On/Off switch on it and bam, you're done. That's the easiest way for complete beginners. I had mine like that for a while when I first got the car and then decided to hard wire them in using installation 2.

    Installation 2.) [A bit more advanced, but still not too hard] - First, if you're using the EuroEFX lights that I recommend, you have to cut off the cigarette lighter adapter. Grab your wire cutters and snap that off so you have just the wires.

    Next mount the lights where you want them to sit. I used gorilla tape to hold my passanger side lights onto the bottom of the dash, next to the foot blower air vent.


    On the drivers side theres the steering column so there isn't really anywhere to mount the lights. I found if you follow your steering wheel down to the general area you mounted on the passenger side, you'll feel a lip that goes up. I stuck mine right ontop of that lip. If you push it up there and turn it so it faces out it works perfect. After you've cut the cigerette lighter adapter off you'll be left with 2 sets of wires. Each set will have a yellow and white wire stuck together. You'll need to seperate the yellow from the white on each set. I used a pocket knife, there may be a better tool suited for this, but that's what I used. 2 inches of seperation should be good enough, there's no need to seperate the whole thing (make sure you don't cut through the wire casing while seperating it. You don't want any exposed wiring. If you do, throw a piece of electrical tape over it, or lop it off and try again.) Next run the wire through the back of the center console. There should be a seam below the ash tray where you can slide the wires through, that way they'll run through the back.


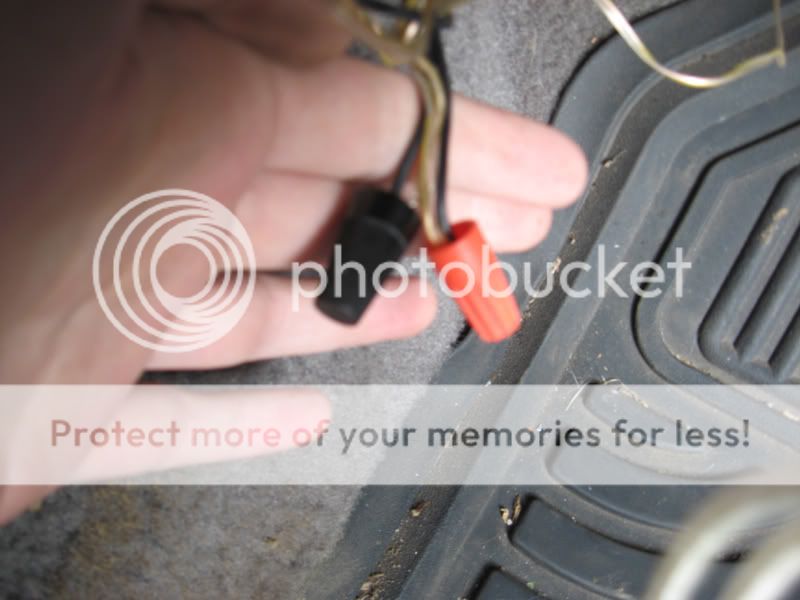
    Now, you should have the ends of both wires on the passenger side. Strip the ends of both white wires and both yellow wires (you should have seperated the two sets so you have 4 ends.) Twist the stripped ends of the yellow wires together. Now twist the stripped ends of the white wires together. On these lights the white wires are negitive and the yellow wires are positive. Now that we've got our positive and negitive wires seperated, we can run a power wire and a ground wire. You're going to need to figure out where you want to ground to. Anything metal should work. I loosened a nut on the drivers side firewall and just tightened it back up with the wire behind it (see picture.)


    (I have more than just the footwell lights wired up, that's why there's more than one wire grounded here. You should only have one wire grounded against the firewall for this project.)

    That's what I recommend. So take some of your wire that you purchased and measure it out from where you're grounding, to the ends of the white wires twisted together on the passenger side. Once again I slid this wire through that seam so it was concealed behind. Make sure you have a little extra too, don't make it the exact length. You can always cut wire off, putting it back on is a bit more difficult lol. Strip both ends of the wire for the ground. Using a wire connector cap, connect the white twisted wires to the ground wire.


    (Picture is of both positive and negative wire caps, so right now you should only have the the negative wires capped together.)

    Bolt the other end of the ground wire to something metal on the car and your lights are now grounded. It's time to move onto power.

    If you look at the driver's side foot well, there's a fuse pannel on the left. There's a little knob to turn and the cover pops right off. This is where you're going to draw your power from. Take the inline fuse wire and crimp the wire to plug adapter on one end.


    Put the 2 amp fuse in the holder on the fuse wire. Take one of your wire couplers and crimp it on the other end of the fuse wire. Take some of the wire you purchased and strip one end. Then place that stripped end of the bought wire and crimp it into the open side of the coupler on the fuse wire. Now our switch comes into play. Figure out where you want to put your switch. Some people mount them into the existing switch spots either in the dash or the center console. Mine sits partially underneath the floor mat on the driver's side for the hidden factor. Where ever you decide to put your switch is fine. If you're using the EuroEFX lights, do not use the silver switch that comes with it. Look at the switches at Autozone and either buy one there, or buy one that Autozone has, cheaper at Walmart. So with one end of your big spool of wire crimped into the inline fuse wire, measure out the other end to the switch (keep in mind that the fuse end is going into that fuse pannel in the driver side foot well.) Make sure to leave yourself just a little extra wire as I've instructed on the previous steps. Once you have the right length of wire, cut it so all you have is a piece of wire coming from the inline fuse wire. Strip the end of that piece of wire and crimp on a Wire to plug adapter. After doing that you should have one long wire with the inline fuse on it, with a plug adapter on each end. Take the plug adapter that isn't on the fuse wire side and plug it into one of the posts on the back of the switch. Now lets head back to the passenger side foot well. Those two yellow wires that we twisted together previously, we're going to do the same to those as we did to the two white wires. Measure out a piece of wire going from the two yellow wires twisted together, to the switch, and cut it to the proper length. Now strip both ends of the wire you just cut, that will lead to the switch. Using a wire cap, connect that piece of wire we just cut to go to the switch, with the twisted together yellow wires. On the other end of the switch wire, crimp on a plug adapter. Now plug the end of that wire you just crimped, onto a post on the back of the switch (should be the post opposite of the other wire connected to the switch.)


    (I have all 3 posts filled, you should only have 2. One on top, and one of bottom. No middle one.)

    Now there's only one thing left to do. Plug 'er in! One end of your inline fuse wire should be connected to the switch, the other end should have a plug adapter on it and not be connected to anything. Take that wire and plug it into one of the square ports on the top of the drivers side foot well fuse pannel.


    It will work in either Plug 5, or plug 3 (there should be numbers right next to the ports.) Plug 5 is a constantly hot port, meaning if you plug into that one, the footwell lights will be on when the switch is in the on position. Plug 3 is only hot when the headlights are on. Meaning your switch can be constantly left in the on position and the lights will only get power when the headlights are on. Why have the switch at all if you're gunna put it into port 3? A kill switch is always good, incase you get pulled over. Before plugging it into one of the ports, make sure your ground wire is attached and you have a 2 amp fuse in the inline fuse holder. Plug it in, flip the switch into the on position if it's not already in that position and watch the light shine from your new footwells!

    If you have any questions, or it feels like I left something out, please post them.
    Have fun!
    Last edited by Ander; 02-08-2012, 03:01 PM.


    Member's Ride Thread

    Originally posted by mercyboy
    I'd rather lose by a mile because I built my own car then win by an inch because someone else built it for me..your car is your story, so don't let someone else write the book!

    Comment


      #3
      fun. too blue for me. if i were to do this. i'd do a very low soft white. or neon green

      Yes my name is Dang, Don't use in vain
      1992 Honda Accord EX (Coupe/Bordeaux/Auto)
      1992 Honda Accord EX (Coupe/Bordeaux/H22A MT)
      2008 Honda Accord EXL (Coupe/SanMarino/6spd)

      Comment


        #4
        Originally posted by vietkid_2006 View Post
        fun. too blue for me. if i were to do this. i'd do a very low soft white. or neon green
        x2 on very low soft white.

        Good diy tho
        My ride History:
        Accord 90 lx auto: Gone
        Accord 91 dx MT: Gone
        Accord 92 lx auto: Gone
        -----------------------------------
        1st to D.I.Y custom RED/CLEAR's

        Comment


          #5
          What can I say, I like the color blue on cars.


          Member's Ride Thread

          Originally posted by mercyboy
          I'd rather lose by a mile because I built my own car then win by an inch because someone else built it for me..your car is your story, so don't let someone else write the book!

          Comment


            #6
            I used to have some back in the day. They were wired up to the switch for my undercar neons.

            Good DIY.


            KeepinItClean | EnviousFilms | NoBigDeal | YET2BSCENE | .· ` ' / ·. | click here.
            Originally posted by Jarrett
            Is there a goal you're trying to accomplish besides looking dope as hell?

            Comment


              #7
              Thanks.


              Member's Ride Thread

              Originally posted by mercyboy
              I'd rather lose by a mile because I built my own car then win by an inch because someone else built it for me..your car is your story, so don't let someone else write the book!

              Comment


                #8
                looks nice


                Purchased from: 90-JDMCB7, cb95spd, 92_dr_p, ukaccord92, slammed4thgen, 93a-lude, h22anow, cb7addicted, H22WAGON93, tonymontana1204, agol, Joshy

                Sold to: di2accord

                Comment


                  #9
                  uh...
                  wat?

                  Comment


                    #10
                    Originally posted by accord=inspire?
                    and is it dangerous to have so many wires near the pedals?
                    Not if you conceal them properly. If they're just all over yeah, of course it is. But the wires go behind panels.


                    Member's Ride Thread

                    Originally posted by mercyboy
                    I'd rather lose by a mile because I built my own car then win by an inch because someone else built it for me..your car is your story, so don't let someone else write the book!

                    Comment


                      #11
                      Nice write up
                      **Blk Housed Slut Crew Member #1**

                      **Don't b scared be prepared for the worst**
                      Da Drizzle's Sedan - Dr. Diy's Blk Housed Thread

                      '90 2Tone Coupe-Car Heaven_'89 Lude-Junk Yard
                      Mostly Usdm, some Jdm,Edm,&Puerto Rican RICE

                      Comment


                        #12
                        I might just end up doing this. lol
                        nice write up

                        Originally posted by visualpoet
                        some owners think it's the best thing since titties

                        Comment


                          #13
                          i used to have blue lighting in the footwells, under the front seats, lighing up my fiberglass sub box, and in the vents but i never had much luck with LED or neon bars. the vibration just made the wires pull out of them. then again i never got good lights, just whatever i could find for cheap.

                          Click for my Member's Ride Thread
                          Originally posted by Stephen Fry
                          'It's now very common to hear people say, "I'm rather offended by that", as if that gives them certain rights. It's no more than a whine. It has no meaning, it has no purpose, it has no reason to be respected as a phrase. "I'm offended by that." Well, so fucking what?' —Stephen Fry
                          Eye Level Media - Commercial & Automotive Photography: www.EyeLevelSTL.com

                          Comment


                            #14
                            Originally posted by Juan4DCB7 View Post
                            I might just end up doing this. lol
                            nice write up
                            I hope you do. It's a very satisfying addition.


                            Member's Ride Thread

                            Originally posted by mercyboy
                            I'd rather lose by a mile because I built my own car then win by an inch because someone else built it for me..your car is your story, so don't let someone else write the book!

                            Comment


                              #15
                              I would rather tap into whatever powers the overhead light to a relay and go from there... cool mod though


                              Originally posted by lordoja
                              im with you on that one bro! aint nothing beat free food and drinks any day of the week, even if its at a funeral

                              Comment

                              Working...
                              X