Announcement

Collapse
1 of 2 < >

ANY BUYING/SELLING IN THIS FORUM WILL RESULT IN AN INSTANT BAN!

Read the rules: http://www.cb7tuner.com/vbb/showthread.php?t=43956

Myself, and the other mods have been very nice and lenient with the rules. We have been deleting threads, and giving out warnings. Some members didn't get the clue and re-posted over and over... Now ANY member buying or selling in this section will be banned... No IF's AND's or BUT's.
2 of 2 < >

Beginner Forum Rules - EVERYBODY read! (old and new members alike!)

Beginners start here. Once you have 30 worthwhile posts (off topic doesn't count) you may post outside of the Beginner forums. Any "whoring" (posting simply to raise your post count) will return your count to 0, or result in a ban.

These are the rules. Read them. Live by them.

1) Absolutely NO flaming! "Flaming" is an outright attack on a member. ALL questions are encouraged to be asked here, no matter how basic. Members with over 30 posts will be subject to a ONE WEEK ban if caught flaming in this forum (and yes, moderators can read deleted posts). Members with under 30 posts will be subject to a ONE DAY ban.

2) Use appropriate language. Racial or sexual slurs will not be tolerated. A ban will be issued at the discretion of the cb7tuner.com staff.

3) No items may be sold in the Beginner forums. Any "for sale" threads will be deleted.

4) Temporarily banned members will be PERMANTLY banned if they are found posting on another account.

The rules can and will be added to. Any updates will be marked in the title.

The rules for the overall forum can be found here:
http://www.cb7tuner.com/vbb/forumdisplay.php?f=144
Read them. You will be expected to follow them.
See more
See less

Front Balance shaft seal and Crank shaft seal replacement

Collapse
X
 
  • Filter
  • Time
  • Show
Clear All
new posts

    #16
    Here is the wood screw technique i mentioned i came across.

    http://forums.audiworld.com/showthread.php?t=349927

    Courtesy of the Audiworld Forum.

    I think its safer as it doesnt rely on driving the screw right through the seal (less work) and letting the screw hit the metal behind the seal (which may damage the actual engine if the seal is in there tight).

    It relies on good old fashioned tugging. Hence the need for 2 screws and a bar across both to aid in getting leverage and grip.

    But alas its no use to my situation. However i put it in as it may assist you with the seal your trying to remove.
    Last edited by JDMDriver; 08-09-2010, 10:02 AM.
    Rides:

    Accord
    92-JDM-2.0 Si- "4ws" - Cobalt Blue Pearl
    96-AUDM-2.2 VTiS- Heather Mist

    CR-X
    88-JDM-Si- Black

    CR-X Del Sol
    92-JDM-SiR "Transtop" Motegi Edition - Silver
    95-JDM-SiR "Transtop" Daytona Edition - Silver
    92-JDM-SiR "Transtop" - Black

    Prelude
    91-JDM-Si-4ws "Si States" - Phoenix Red
    91-AUDM-Si-4ws "Cita Lux Edition" - Bordeaux Red Pearl
    91-AUDM-Si-4ws "Cita" - Cobalt Blue Pearl
    91-AUDM-Si-4ws "Cita Lux Edition"- Gun Metal Grey

    Comment


      #17
      You do NOT want to cause any scratches...being aluminum means it will scratch VERY easily.

      I used to use a SMALL screw on the side of the seal facing you when you look at it...sorta in the middle...but again you have to be careful...you do not want to go to far in or another damage.

      To be honest removing and installing seals is not that hard...but there is a "feel" to it...especially on install...if you install it too far...you can not get it back without damaging it.

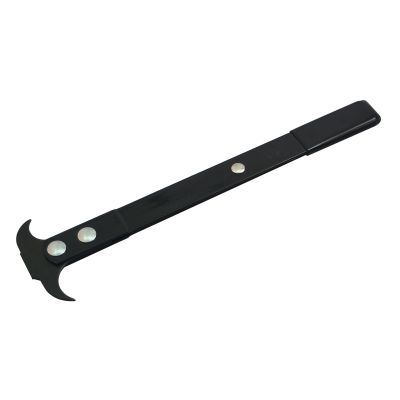
      There is a tool used also...here is a pic;


      one part of the tool sits on the OUTSIDE face of the casing...the other end goes JUST inside the seal enough to hook. Sometimes this tool will not work though.

      I must emphasize again being careful not to make ANY scratches, if you do it will not seal.

      Sometimes you may apply a small amount of rtv on the outter race of the seal...some do some do not.

      Always apply a little bit of grease on the inside of the seal...not on the outside.

      It is always best to press the new seal in not hammer it in...or tapping it in.
      Last edited by bcjammerx; 08-09-2010, 10:21 AM.
      ____

      Comment


        #18
        bcjammerx - Yes i came across this but this remover relies on the end hooks getting in the seal before the head can be used as a leverage.

        Since I couldnt get the self tapping screw to get in the seal i dont think this one will either (so i abandoned getting it).

        I am really worried that yes being aluminium (or alloy) it is soft metal. Hence why i may resort to pulling the whole oil pump part off. This way im thinking i can put it on the bench and remove the seal with all the room, light and tools i have at my disposal and 360 vision to avoid scratching the side and see once and for all what is going on in there.

        It is pushed in fairly deep too i may add (not flush with the outside wall). Not sure but this may be a contributing factor to my difficulty.
        Last edited by JDMDriver; 08-09-2010, 10:24 AM.
        Rides:

        Accord
        92-JDM-2.0 Si- "4ws" - Cobalt Blue Pearl
        96-AUDM-2.2 VTiS- Heather Mist

        CR-X
        88-JDM-Si- Black

        CR-X Del Sol
        92-JDM-SiR "Transtop" Motegi Edition - Silver
        95-JDM-SiR "Transtop" Daytona Edition - Silver
        92-JDM-SiR "Transtop" - Black

        Prelude
        91-JDM-Si-4ws "Si States" - Phoenix Red
        91-AUDM-Si-4ws "Cita Lux Edition" - Bordeaux Red Pearl
        91-AUDM-Si-4ws "Cita" - Cobalt Blue Pearl
        91-AUDM-Si-4ws "Cita Lux Edition"- Gun Metal Grey

        Comment


          #19
          I want to point out that a screw all the way thru the seal could slightly damage the back wall of the seal bore, but that isn't the sealing area--the crankshaft surface and the crankshaft seal bore outer surface are, so I'm not sure that would really be much of an issue. keep in mind that the seal itself is not usually driven all the way to the back of the bore anyways, so oil is behind it and a nick back there shouldn't be any issue--unless it causes metal shavings.

          I would take that self tapping screw and test it elsewhere on the block, on the outside someplace, to get a sense of what kind of potential damage we're talking about here. I bet it's not much.

          Using a prick punch or awl you may be able to put a small pilot hole in the seal, then use the screw method.

          Just saying.

          Also, I've never had the oil pump off myself so I'm not exacly sure of the geometry of the seal bore and what's behind it so I could be wrong but I bet what I wrote above is pretty close to on target.

          EDIT: Ok, sorry about that. just read your earlier comment and see this won't be possible for space reasons.
          Last edited by batever; 08-09-2010, 11:41 AM.

          Comment


            #20
            If you did have room to drill, which you don't, you could modify a drill bit so it won't go deeper than that metal reinforcement (put JB Quick on the drill bit shaft at a point to stop the drill going deeper than that area), drill just through the metal reinforcement, then put the wood screws in.

            Comment


              #21
              right...you NEVER screw the screw in very far...JUST BARELY.

              I never used a self tapping screw...just a small one with a sharp point. Put it where you want...then tap the screw to make an indention or even punctures just a hair...then screw it in JUST a little...I never really got a full thread in that is how little.

              I had to use this method more times than not because that tool just does not get in those tight spaces and...it does not work on everything.

              Also, I would sometimes end up with the screw not holding and the screw would pull out, you could then use a pick in the hole the screw made and pull it out with the pic
              ____

              Comment


                #22
                JDM, I've been reading this thread for two weeks and dreading doing my seals because of it.

                I finished three seals - fnt balancer shaft, crank and cam - this weekend. All were pretty dang easy to remove. I used a small, jewler's size screwdriver with maybe a 1/8 inch wide tip to pry into the seam between the shaft and seal. Then I just leveraged up from the inside shaft all the way around. They all popped out with minimal fuss.

                For insertion a socket and hammer worked for the cam.
                For the crank, I used your trick of layering the new seal, old seal and inner crank gear then tightening the crank pulley on. Remove the gear pully and tap in in to finish.
                For the frn balancer seal I used the same crank gear with a large socket as a spacer. Then I used a crow bar and pressured the seal around its entire diameter to press it in.

                It all was much easier than I'd expected.
                90 Accord Ex, F22A4. Slight fire damage.

                Comment


                  #23
                  Just an update.

                  I have removed all my seals and have replaced them and now doing my oil tube seals.

                  I actually removed the seals about a week or so ago but havent been able to update this thread due to commitments.

                  I ended up removing my oil pump (or rear balancer shaft gear housing) and oil pump housing (bottom section of the engine).

                  I am glad to have made the decision of removing the oil pump as although it was more involved it was not that difficult and less risky in removing the stubborn seal.

                  When i did try to remove the seal (by punching a socket to push it out) the amount and the strength of the hits to push it out confirmed no amount of hooking, picking and prying from the front would have worked.
                  Last edited by JDMDriver; 08-19-2010, 06:14 AM.
                  Rides:

                  Accord
                  92-JDM-2.0 Si- "4ws" - Cobalt Blue Pearl
                  96-AUDM-2.2 VTiS- Heather Mist

                  CR-X
                  88-JDM-Si- Black

                  CR-X Del Sol
                  92-JDM-SiR "Transtop" Motegi Edition - Silver
                  95-JDM-SiR "Transtop" Daytona Edition - Silver
                  92-JDM-SiR "Transtop" - Black

                  Prelude
                  91-JDM-Si-4ws "Si States" - Phoenix Red
                  91-AUDM-Si-4ws "Cita Lux Edition" - Bordeaux Red Pearl
                  91-AUDM-Si-4ws "Cita" - Cobalt Blue Pearl
                  91-AUDM-Si-4ws "Cita Lux Edition"- Gun Metal Grey

                  Comment


                    #24
                    To anyone with a stubborn seal (or going on your 3rd timing belt change) i recommend to use the oil pump remove method.

                    Engines with stubborn seals
                    ---------------------------

                    Its most effective as it provides access to stuck seals from inside out (hit the seal from behind with a socket and mallet). You can put more hit force on the seal than any contraption can by pulling it.

                    I dont recommend over persevering with a stubborn seal (like i did) with high risk of gouging, chipping the seal housing or scoring the shaft etc. not to mention wasting unecessary time.

                    It does require more components to be removed (exhaust down pipe, cross member and oil sump) but it really isnt that hard.

                    Engines on the 3rd timing belt or more
                    -------------------------------------

                    I recommend this if your car is being fitted its 3rd timing belt (or more) as it allows you to replace your old oil sump gasket (which is probably starting to leak and will only get worse or already leaking badly).

                    It also allows you to change your oil pump gasket. My oil pump gasket was as brittle as chalk and no doubt yours will be too. It wasn't leaking but im glad i changed it as there's now no chance of it leaking (on long drives or any awkward time).

                    Another bonus to this exercise is you get to know and see all the hard cast timing marks (not your cheat markings you made before dis assembly of the timing belts) and your able lock the rear balancer shaft properly (if you weren't able to or have lost the timing).

                    Just like how the oil tube seals are recommended to be changed with your timing belt (as a preventative maintenance) i recommend the oil sump and oil pump seals be changed too (as preventative maintenance), it ensures trouble free motoring. Why wait?

                    My Opinion
                    -----------

                    Preventative maintenance are the BEST form of maintenance as its predictable, under your control when and where you want to take your car off the road. But most of all it ensures peace of mind and continued enjoyment of your vehicle for long periods of time.

                    At first it may seem your doing more than required and redundant maintenance work but it will pay you HUGE dividends in the future.

                    Adopting the "if it aint broke dont fix it" approach means when it does break it will be when your not ready and not on your own terms (time, day or financial readyness) to fix and your fixes are only maintenance completed in installments (resulting in frequent and more interuptions to your driving enjoyment).
                    Last edited by JDMDriver; 08-19-2010, 06:57 AM.
                    Rides:

                    Accord
                    92-JDM-2.0 Si- "4ws" - Cobalt Blue Pearl
                    96-AUDM-2.2 VTiS- Heather Mist

                    CR-X
                    88-JDM-Si- Black

                    CR-X Del Sol
                    92-JDM-SiR "Transtop" Motegi Edition - Silver
                    95-JDM-SiR "Transtop" Daytona Edition - Silver
                    92-JDM-SiR "Transtop" - Black

                    Prelude
                    91-JDM-Si-4ws "Si States" - Phoenix Red
                    91-AUDM-Si-4ws "Cita Lux Edition" - Bordeaux Red Pearl
                    91-AUDM-Si-4ws "Cita" - Cobalt Blue Pearl
                    91-AUDM-Si-4ws "Cita Lux Edition"- Gun Metal Grey

                    Comment


                      #25
                      Originally posted by JDMDriver View Post
                      To anyone with a stubborn seal (or going on your 3rd timing belt change) i recommend to use the oil pump remove method.

                      Engines with stubborn seals
                      ---------------------------

                      Its most effective as it provides access to stuck seals from inside out (hit the seal from behind with a socket and mallet). You can put more hit force on the seal than any contraption can by pulling it.

                      I dont recommend over persevering with a stubborn seal (like i did) with high risk of gouging, chipping the seal housing or scoring the shaft etc. not to mention wasting unecessary time.

                      It does require more components to be removed (exhaust down pipe, cross member and oil sump) but it really isnt that hard.

                      Engines on the 3rd timing belt or more
                      -------------------------------------

                      I recommend this if your car is being fitted its 3rd timing belt (or more) as it allows you to replace your old oil sump gasket (which is probably starting to leak and will only get worse or already leaking badly).

                      It also allows you to change your oil pump gasket. My oil pump gasket was as brittle as chalk and no doubt yours will be too. It wasn't leaking but im glad i changed it as there's now no chance of it leaking (on long drives or any awkward time).

                      Another bonus to this exercise is you get to know and see all the hard cast timing marks (not your cheat markings you made before dis assembly of the timing belts) and your able lock the rear balancer shaft properly (if you weren't able to or have lost the timing).

                      Just like how the oil tube seals are recommended to be changed with your timing belt (as a preventative maintenance) i recommend the oil sump and oil pump seals be changed too (as preventative maintenance), it ensures trouble free motoring. Why wait?

                      My Opinion
                      -----------

                      Preventative maintenance are the BEST form of maintenance as its predictable, under your control when and where you want to take your car off the road. But most of all it ensures peace of mind and continued enjoyment of your vehicle for long periods of time.

                      At first it may seem your doing more than required and redundant maintenance work but it will pay you HUGE dividends in the future.

                      Adopting the "if it aint broke dont fix it" approach means when it does break it will be when your not ready and not on your own terms (time, day or financial readyness) to fix and your fixes are only maintenance completed in installments (resulting in frequent and more interuptions to your driving enjoyment).
                      Thanks for posting back with your updates.

                      I like your advice, too.

                      Comment

                      Working...
                      X