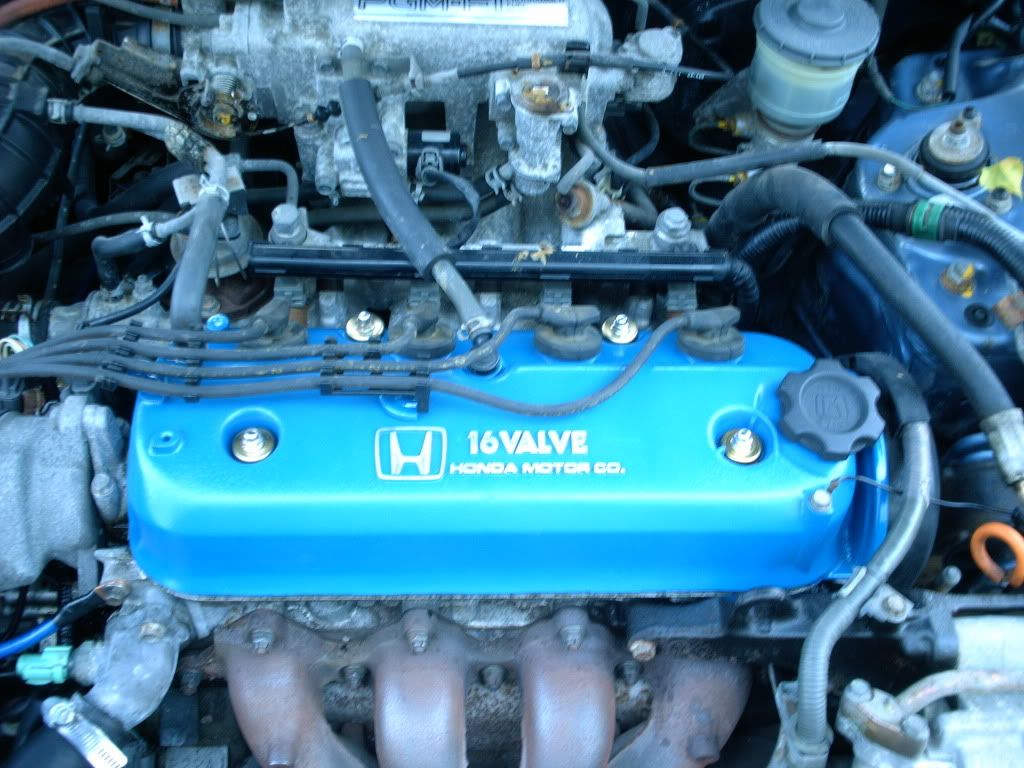
Hey guys, I know this outta be in the DIY section but I can't post there quite yet. This is a mighty nice art project that can make your generic little F22 reflect how much work you've done on the inside.
Whatcha need:
-a valve cover (dur!) mine was $9 from a u-pull yard
-sandpaper- 100, 300, and 600 grit size
-paint stripper- just like .5L
-toothpicks for the tiny cracks
-a dropcloth or trashbag
-hi-temp primer, paint, and clear coat
-other useful stuff like foam brushes, paper towels, etc
-(optional) a fine tip dremel sander for small corners
How to do it:
1) clean off your cover with soap and water since it's gonna be covered in oil and road grime

2) paint on a layer of goopy paint stripper. **this stuff is really toxic and can burn skin off really quick! Also, only pour it into metal or glass** Rinse with water and alot of paint will come off. You might want to do this twice and make sure you get into the cracks.


3) dry it off to keep the inside from gettin rusty. Only took like 10mins since it was like 150deg that day
4) sand off the last few bits of paint with 100 grit paper and make a pretty even surface (it'll have some hefty scratches in it) Wipe it off b/n sets to keep from filling your sandpaper with dustiness.

5) do the same with the 300 and 600 grit paper until it looks smooth.
(side note: if you do well enuf, it'll look like brushed aluminum after the 300g and you could just clear coat it)

6) wipe it clean again and go back outside. Using loooong, even, light strokes, put down a layer of primer. Do it like the pro guys do with air guns! Too thick and it'll run and you can't fix that too easy. Wait 15mins and do another.

7) do 2-3 layers of your color paint depending on how you like it. Same way with really light, even coats. If it's too humid to dry, run a fan next to ya or else all the random dust will stick to it!

8) Sand the emblems back to metal and do a layer or 2 of clear if you want. It'll make it glossier and keep it from getting nasty as fast. Still got some touchups to do on my "H" but I fixed that.

9) let it dry for at least 12h and the lay it on some foil in a 200F oven for 20mins to set it. Don't let any oil fall in the oven or it'll smoke. You should be fine over foil or a big tray.
10) go show off how uncharacteristically awesome your little single cam motor can be! Be creative and try patterns and stencils. I'd stay away from trying to match intake and spark plug wire colors, it never turns out quite the same.
Good luck to ya all and CB7tuner rulez!
Shankenstein
Whatcha need:
-a valve cover (dur!) mine was $9 from a u-pull yard
-sandpaper- 100, 300, and 600 grit size
-paint stripper- just like .5L
-toothpicks for the tiny cracks
-a dropcloth or trashbag
-hi-temp primer, paint, and clear coat
-other useful stuff like foam brushes, paper towels, etc
-(optional) a fine tip dremel sander for small corners
How to do it:
1) clean off your cover with soap and water since it's gonna be covered in oil and road grime

2) paint on a layer of goopy paint stripper. **this stuff is really toxic and can burn skin off really quick! Also, only pour it into metal or glass** Rinse with water and alot of paint will come off. You might want to do this twice and make sure you get into the cracks.


3) dry it off to keep the inside from gettin rusty. Only took like 10mins since it was like 150deg that day
4) sand off the last few bits of paint with 100 grit paper and make a pretty even surface (it'll have some hefty scratches in it) Wipe it off b/n sets to keep from filling your sandpaper with dustiness.

5) do the same with the 300 and 600 grit paper until it looks smooth.
(side note: if you do well enuf, it'll look like brushed aluminum after the 300g and you could just clear coat it)

6) wipe it clean again and go back outside. Using loooong, even, light strokes, put down a layer of primer. Do it like the pro guys do with air guns! Too thick and it'll run and you can't fix that too easy. Wait 15mins and do another.

7) do 2-3 layers of your color paint depending on how you like it. Same way with really light, even coats. If it's too humid to dry, run a fan next to ya or else all the random dust will stick to it!

8) Sand the emblems back to metal and do a layer or 2 of clear if you want. It'll make it glossier and keep it from getting nasty as fast. Still got some touchups to do on my "H" but I fixed that.

9) let it dry for at least 12h and the lay it on some foil in a 200F oven for 20mins to set it. Don't let any oil fall in the oven or it'll smoke. You should be fine over foil or a big tray.
10) go show off how uncharacteristically awesome your little single cam motor can be! Be creative and try patterns and stencils. I'd stay away from trying to match intake and spark plug wire colors, it never turns out quite the same.
Good luck to ya all and CB7tuner rulez!
Shankenstein


Comment