
this is a DIY to add the rear sidemarker lights from the 5th gen onto a 4th gen wagon.
for this DIY you do not have to remove the bumper. but you do have to tape up all the outside of the bumper so you can write the measurements on it.
if your looking for the sedan/coupe one go here.
Making the hole....
tools:
-tape (blue painters is best)
-cutting tool (box cutter was best for me)
-tape measurer (I just used a ruler)
-black marker/pen
1.you have to clean the whole side of the bumper so you can tape it up.
2. tape up the whole side of the bumper from the top black trim to the lower black trim & from just behind the rear wheel to the part of the bumper where it starts curbing around the corner.
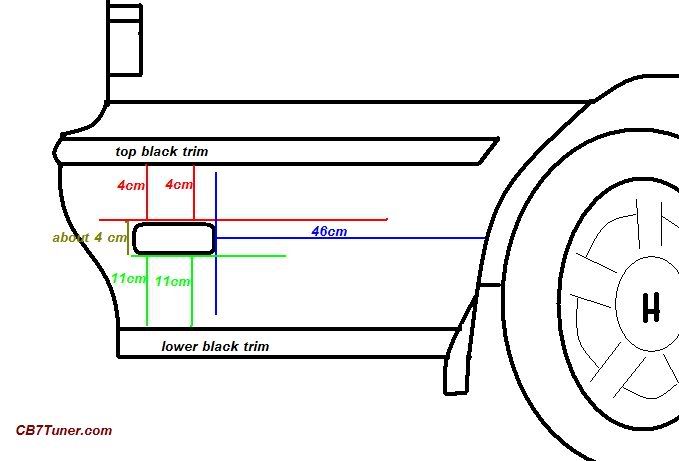
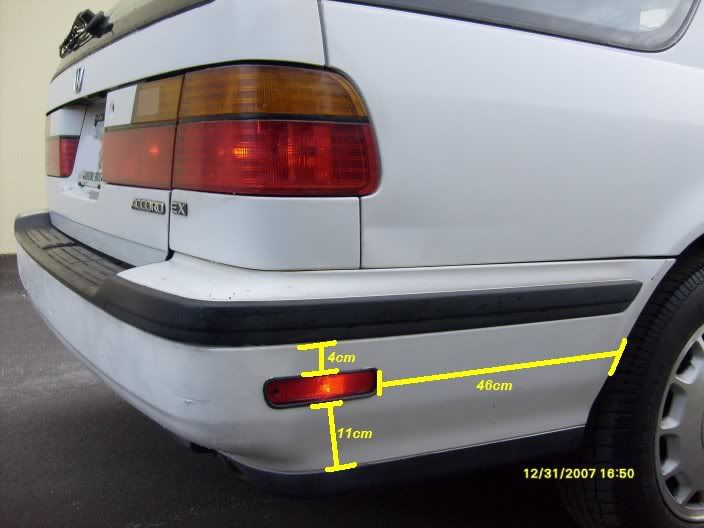
3.now get a ruler & measure down 4cm from just below the top black trim piece (see 1st pic above) & mark it down. now repeat this again like an inch away from where you just did it. after that make an extra long horesontal line with the marker/pen connecting the two markings. when your done you should see a long line which is 4cm below the top black trim peice. (red line in 1st pic above)
4.now measure 46cm from the area of the bumper right after the back wheel (about 5cm down from the top back trim peice). & mark it with a big virtical line. (blue line in 1st pic above.)
5. now from top of the lower black trim measure up 11cm's & mark it. then repeat an inch to the side of this line. after that connect those 2 markings with a long horezontal line. (green line in 1st pic above)
6.look at your work now. you should start to see where the light cut out will go. also the gap between the top line (the red one in 1st pic above), should be around 4cm from the lower line (green one in 1st pic above).
7.now just to be sure, get the rubber part that goes around the sidemarker light & hold it up to the upper right corner of the markings (where the blue & red lines meet). make sure that the angled side faces the back of the car.
8.now trace it with the marker/pen along the back of the rubber peice. you should now have a clear outline of the cutout area for the light.
9.now get that box cutter & cut along the inside of the outline you just did. then test fit the light with the rubber peice. & trim a bit where needed.
10. you are now done with the cutting of the hole. & if youd like take off the tape.
Connecting the wires...
tools
-flathead/phillips screw driver (for the interior panels)
-electrical tape
-four splices for the wires
-wire cutters
-box cutter
-4 long wires (about 1ft&1/2 long each)
-4 wire couplers
-silicone sealer
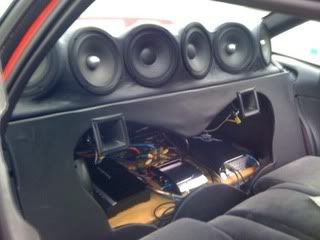
1.take off the panels on the inside of the wagons side storage door. & off the whole area where the 5th big speaker is. also remove that speaker.
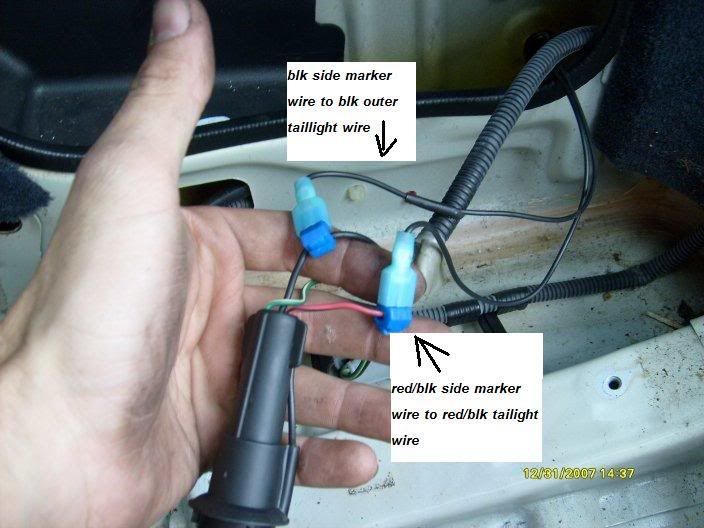
2.remove the rubber plugs (see 1st pic below) thats on the metal sides of the car. now cut slit in them to pass the wires through them later on & put them off to the side for now.
3.now get the short pigtail harness that came with your sidemarker lights & connect about 1FT&1/2 of wires to the pigtail using the couplers. (make sure to mark them so you know which is which if you use the same color wires)
4.pass the now long pigtail harness through the rubber plug you took out.
5.now stick the wires through the new bumper hole & through the hole in the cars body making sure the rubber plug sits back into that hole it came from. then seal the little hole where the wires stick through the rubber with silicone
6.plug the sidemarker to the pigtail harness then put on the sidemarker & its rubber ring onto the bumper & secure it all to the bumper. next move on to the inside to finish connecting the wires.
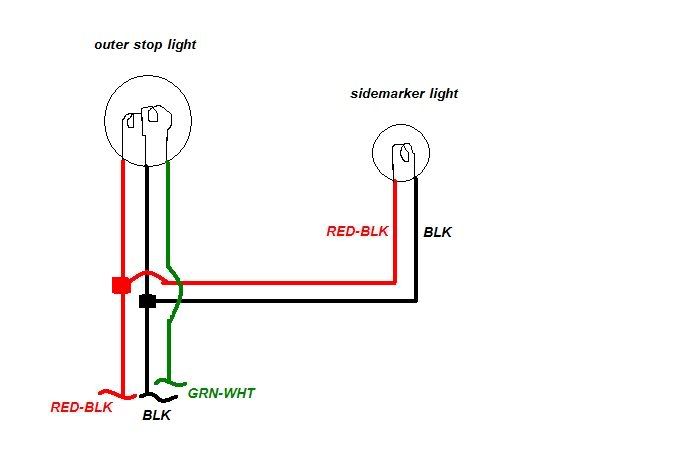
7.on the inside get the wires you just stuck through the hole where that rubber peice was & connect it to the outer stoplight using the splicers you got. (see 2nd & 3rd pic below)
8.when your done with that you should have the sidemarkers blk & red/blk wires connected to the outer stoplights blk & red/blk wires.
9.now that every thing is connected turn on your parking lights. the new sidemarkers should come on. now step on the brakes. it should not change brightness it you wired it like I told you. (just like in the 5th gens).
10.finally put every panel back on. & step back & look at your new modification.

comments?
question?
suggestions?

(I worked hard on this so I hope you can understand it)
for this DIY you do not have to remove the bumper. but you do have to tape up all the outside of the bumper so you can write the measurements on it.
if your looking for the sedan/coupe one go here.
Making the hole....
tools:
-tape (blue painters is best)
-cutting tool (box cutter was best for me)
-tape measurer (I just used a ruler)
-black marker/pen
1.you have to clean the whole side of the bumper so you can tape it up.
2. tape up the whole side of the bumper from the top black trim to the lower black trim & from just behind the rear wheel to the part of the bumper where it starts curbing around the corner.
3.now get a ruler & measure down 4cm from just below the top black trim piece (see 1st pic above) & mark it down. now repeat this again like an inch away from where you just did it. after that make an extra long horesontal line with the marker/pen connecting the two markings. when your done you should see a long line which is 4cm below the top black trim peice. (red line in 1st pic above)
4.now measure 46cm from the area of the bumper right after the back wheel (about 5cm down from the top back trim peice). & mark it with a big virtical line. (blue line in 1st pic above.)
5. now from top of the lower black trim measure up 11cm's & mark it. then repeat an inch to the side of this line. after that connect those 2 markings with a long horezontal line. (green line in 1st pic above)
6.look at your work now. you should start to see where the light cut out will go. also the gap between the top line (the red one in 1st pic above), should be around 4cm from the lower line (green one in 1st pic above).
7.now just to be sure, get the rubber part that goes around the sidemarker light & hold it up to the upper right corner of the markings (where the blue & red lines meet). make sure that the angled side faces the back of the car.
8.now trace it with the marker/pen along the back of the rubber peice. you should now have a clear outline of the cutout area for the light.
9.now get that box cutter & cut along the inside of the outline you just did. then test fit the light with the rubber peice. & trim a bit where needed.
10. you are now done with the cutting of the hole. & if youd like take off the tape.
Connecting the wires...
tools
-flathead/phillips screw driver (for the interior panels)
-electrical tape
-four splices for the wires
-wire cutters
-box cutter
-4 long wires (about 1ft&1/2 long each)
-4 wire couplers
-silicone sealer
1.take off the panels on the inside of the wagons side storage door. & off the whole area where the 5th big speaker is. also remove that speaker.
2.remove the rubber plugs (see 1st pic below) thats on the metal sides of the car. now cut slit in them to pass the wires through them later on & put them off to the side for now.
3.now get the short pigtail harness that came with your sidemarker lights & connect about 1FT&1/2 of wires to the pigtail using the couplers. (make sure to mark them so you know which is which if you use the same color wires)
4.pass the now long pigtail harness through the rubber plug you took out.
5.now stick the wires through the new bumper hole & through the hole in the cars body making sure the rubber plug sits back into that hole it came from. then seal the little hole where the wires stick through the rubber with silicone
6.plug the sidemarker to the pigtail harness then put on the sidemarker & its rubber ring onto the bumper & secure it all to the bumper. next move on to the inside to finish connecting the wires.
7.on the inside get the wires you just stuck through the hole where that rubber peice was & connect it to the outer stoplight using the splicers you got. (see 2nd & 3rd pic below)
8.when your done with that you should have the sidemarkers blk & red/blk wires connected to the outer stoplights blk & red/blk wires.
9.now that every thing is connected turn on your parking lights. the new sidemarkers should come on. now step on the brakes. it should not change brightness it you wired it like I told you. (just like in the 5th gens).
10.finally put every panel back on. & step back & look at your new modification.
comments?
question?
suggestions?
(I worked hard on this so I hope you can understand it)


 taking off the bumper would have added too much time for me

Comment