Tools:
Phillips Screwdriver
Ratchet
8mm, 10mm & 12mm Sockets
10mm & 12mm Wrench
Pliers
Hammer (optional)
Pros: Its built great and strong…welds are clean and the shifter is painted a nice black color and the shifts are a lot shorter…more than worth the cost of the service
Cons: With the item itself none really but there were a couple of inconveniences. First off, it took me a along time to get the shifter back from Fushigi RES but they did give me a future discount for the inconvenience. Also, the shifter was missing a 7mm bolt that holds one of the cables in place. It was an easy fix but I wasted time trying to hunt down the bolt and it being Sunday and a lot of hardware stores close by were closed, didn’t help the situation…but it was an easy .25 cent fix.
Disclaimer: This are the instructions showing how I did the install, I am not responsible if you mess up your car in any way shape or form. On a difficulty scale I give it a 1 out of 10…now on to the DIY
1. Unclip the shift boot by pulling down on the front of the ring that is connected to the shift knob. Once you unclip the shift boot, remove the shift knob by unscrewing it from the shifter (remember righty tighty, lefty loosey)
2. Remove the center console by using the Phillips screwdriver to take all the little screws on the side of the console off (about 4 on each side, 8 total). The console is made in two pieces, I was able to remove just the front piece (my console is messed up a bit) but I think you have to remove both of them (the one that covers the shifter and the one the covers the e-brake). Now you will be able to see the shifter.
3. Disconnect both shifter cables by removing the cotter pin from the left shifter cable and removing the small 8mm bolt on the right shifter cable.

4. now remove the cable stays that hold the shifter cables in place by either using a hammer and screwdriver and hit them off (gently) or by using the pliers to pull them off…they’re on there pretty good so its not going to be easy, keep at it, they will come off.

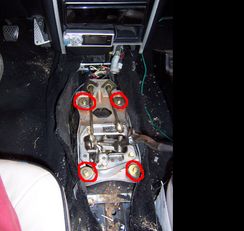
5. Loosen these 4 bolts to make your job a bit easier later on in the install

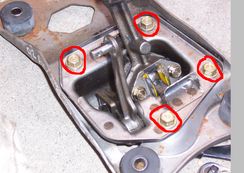
6. Remove the 4 bolts that hold the shifter assembly in place.

7. Here is the shifter assembly removed next to the Fushigi RES shifter

8. Now remove the 4 bolts you already loosened.

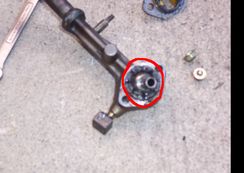
9. Remove this bolt and the shifter should pop right off

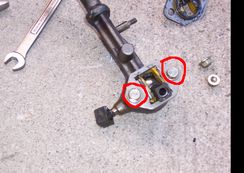
10. Remove the 2 bolts that hold the grease covers on

11. Pull out the bearing covered with grease from the stock shifter and put it in the Fushigi RES Short Shifter

12. Installation is the reverse of removal
I’ve heard some people having problems with rubbing on the boot or boot plate but so far, I haven’t had any problems. The shifter feels great and now I don’t have to stretch out far when shifting to 5th gear (which I hardly do but very convenient if I have to).
Phillips Screwdriver
Ratchet
8mm, 10mm & 12mm Sockets
10mm & 12mm Wrench
Pliers
Hammer (optional)
Pros: Its built great and strong…welds are clean and the shifter is painted a nice black color and the shifts are a lot shorter…more than worth the cost of the service

Cons: With the item itself none really but there were a couple of inconveniences. First off, it took me a along time to get the shifter back from Fushigi RES but they did give me a future discount for the inconvenience. Also, the shifter was missing a 7mm bolt that holds one of the cables in place. It was an easy fix but I wasted time trying to hunt down the bolt and it being Sunday and a lot of hardware stores close by were closed, didn’t help the situation…but it was an easy .25 cent fix.
Disclaimer: This are the instructions showing how I did the install, I am not responsible if you mess up your car in any way shape or form. On a difficulty scale I give it a 1 out of 10…now on to the DIY
1. Unclip the shift boot by pulling down on the front of the ring that is connected to the shift knob. Once you unclip the shift boot, remove the shift knob by unscrewing it from the shifter (remember righty tighty, lefty loosey)
2. Remove the center console by using the Phillips screwdriver to take all the little screws on the side of the console off (about 4 on each side, 8 total). The console is made in two pieces, I was able to remove just the front piece (my console is messed up a bit) but I think you have to remove both of them (the one that covers the shifter and the one the covers the e-brake). Now you will be able to see the shifter.
3. Disconnect both shifter cables by removing the cotter pin from the left shifter cable and removing the small 8mm bolt on the right shifter cable.

4. now remove the cable stays that hold the shifter cables in place by either using a hammer and screwdriver and hit them off (gently) or by using the pliers to pull them off…they’re on there pretty good so its not going to be easy, keep at it, they will come off.

5. Loosen these 4 bolts to make your job a bit easier later on in the install

6. Remove the 4 bolts that hold the shifter assembly in place.

7. Here is the shifter assembly removed next to the Fushigi RES shifter

8. Now remove the 4 bolts you already loosened.

9. Remove this bolt and the shifter should pop right off

10. Remove the 2 bolts that hold the grease covers on

11. Pull out the bearing covered with grease from the stock shifter and put it in the Fushigi RES Short Shifter

12. Installation is the reverse of removal
I’ve heard some people having problems with rubbing on the boot or boot plate but so far, I haven’t had any problems. The shifter feels great and now I don’t have to stretch out far when shifting to 5th gear (which I hardly do but very convenient if I have to).


Comment