Announcement

Collapse
No announcement yet.

ENG: Oil Catch Can (a different method)

Collapse
X
 
  • Filter
  • Time
  • Show
Clear All
new posts

    ENG: Oil Catch Can (a different method)

    I’m not responsible for any damages to you or your car.
    Pictures are used for a guide only.


    EDITED Extra notes: (09.17.04)

    Use a 3/8" fuel / fuel injection hose from your local auto store. you will only need the 2 ft. one, but it will cost around $4 for 2ft. I changed hoses so many times because:

    1. i've heard the vinyl braiding hose will warp due to the high engine temps.

    2. the silicone, when it heats up, gets soft and collapses.

    3. air hose i.d. 300 psi.


    Disregard the pictures of the vinyl braiding tubing and silicone hose. imagine that it is fuel hose.

    Purpose: (thanks to turbopanda from Honda tech)
    In an engine, there are two areas of air pockets in which the air is not directly related to combustion. Within these two areas, oil and air are separated from the combustion chambers and coolant jackets for the purpose of lubrication of the engine. The upper air and oil pocket is constrained by the valve cover at the top, and the valve seals at the lower end. The bottom air and oil pocket is constrained by the piston rings at the top and the oil pan in the bottom.
    In a perfect world, these two lubrication areas would not pressurize. However, in real life compression leaks by valve seals and piston rings in what is called blow-by. Blow by introduces pressure into the two pockets of air and oil (the head and the crankcase). In addition, heat caused as a byproduct of combustion causes air molecules to expand which also causes the pressure to increase in these lubrication areas. If no ventilation system was employed to release this pressure, it would find the point of least resistance to escape, which could be oil seals...or worse.
    To relieve this pressure, a system called Positive Crankcase Ventilation (PCV for short) is used. It is a closed system that takes the pressurized air and oil vapor from these two lubrication areas and introduces it back into the combustion chamber, by way of vacuum caused by the intake charge.


    Parts / Price List:
    You can get most, if not all, of these products are your local hardware store. If not, then good luck finding some


    - air / water separator tank for air compressors = $15

    - (2) ¼” male barbs - $1.50/each

    - (optional) (2) ¼” elbow fittings = $2.20/each

    - Teflon tape = $$0.75
    - (4) 5/8”-1/4” clamps = $.79/each

    - 2 ft 3/8" fuel / fuel injection hose = $4.00 at an auto store

    - steel wool = $1.50

    - total cost of project: $33 or $28 minus the ¼” elbows
    Last edited by cokinut; 09-18-2004, 12:34 AM.
    BBB= Black Bumpered Beauty

    MY MEMBERS RIDE PAGE


    '98 Prelude (BB6) Type SH

    #2
    Instructions:
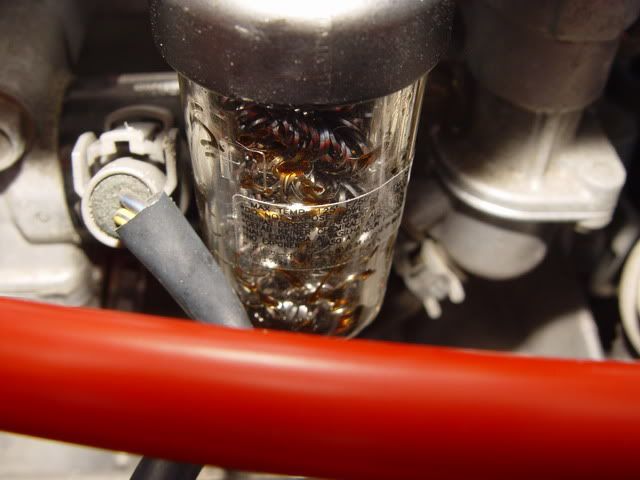
    1. take out the filter from the air/water separator tank. You don’t need this since the steel wool will act as a baffle for the oil.

    2. Stuff enough steel wool in the container to fill it up comfortably. What this does is keep the oil at the bottom of the tank and prevent the vacuum pressure from sucking up the oil from the bottom of the tank.

    3. get the 2 (optional) ¼” elbow fittings and put teflon tape on the threads

    This step is optional because depending on location, you may not need the elbows. They just provide a better fit for the hose in the engine bay.
    4. Screw them onto either end of the air/water separator tank.

    5. get your 2 ¼” male barbs and telfon tape the threads on those.
    6. place the one male barb on each of the elbow fittings.


    7. Make sure everything is tight.


    8. Find a spot to mount your new oil catch can (air/water separator)
    9. Notice on top of the air/water separator, there is an arrow indicating the air flow – remember that when attaching the hoses.
    10. remove the old hose attaching the pcv valve to the intake manifold.
    11. Get your 5/8” vinyl braided hose, cut one piece to go from your pcv valve to the inlet of the air/water separator.
    12. remember to clamp down the ends.
    13. cut another piece of hose to from the outlet of the air/water tank to the intake manifold nipple where the pcv hose thing used to attach to.


    14. now watch how much oil the oil catch can catches.

    Last edited by cokinut; 09-18-2004, 12:29 AM.
    BBB= Black Bumpered Beauty

    MY MEMBERS RIDE PAGE


    '98 Prelude (BB6) Type SH

    Comment


      #3
      SWEET!!!

      BTW what is the other setup just next to the oil catch can?

      I will be dropping by lowes to pick all this up VERY soon
      No more cb7, 7 years of ownership and 196K on the ticker before she was sold

      Current beast: 98 ej8 on 7psi with a 15g turbo and other goodies!

      NREMT-B | 300D and some glass

      Comment


        #4
        it's another oil catch can from the crankcase to the intake. But haven't noticed much oil coming from that. But the oil from the pcv valve to the IM accumulates. Not tons of oil, but a noticeable amount and it'll make you think, my intake manifold must be dirty from 12 years of this oil recirculation
        BBB= Black Bumpered Beauty

        MY MEMBERS RIDE PAGE


        '98 Prelude (BB6) Type SH

        Comment


          #5
          Super Diy this is how they should all be well explaned and illustrated

          Comment


            #6
            WOw, that the best write up of this ive seen yet. Yet another project to add to this list...

            Comment


              #7
              Why did you change the hoses? They too big/small, didnt work or what. I will prolly do this this weekend when i put the h22 in.

              Comment


                #8
                nice work, now i have over 200,000 miles, is this something i would want to do? would this be something that would actually help my engine? does it make that much of a difference that it should be done? thank you.and i still dont undertsnad whu steel wool is needed?
                Last edited by darkcoloraccord; 09-15-2004, 10:21 PM.

                Comment


                  #9
                  im not getting what to do with the steel wool, lil help plz??

                  Comment


                    #10
                    I didnt see it used in the pictures, but the reason for it is to filter the oil out, and keep it near the bottom of the canister. If you had a bit of oil in there, and it sloshed up and all got sucked out, it would make more of a mess than to begin with. But the steel wool will keep it down, and it wont break apart and go into your engine like other things you might use.

                    Comment


                      #11
                      thanx for the comments. I always find myself reading these in depth how to's without pictorials, granted some people do not have access to a camera. But if you have access to a camera, and are making a DIY, then put some up

                      as far as questions go:

                      1. I heard that the vinyl braided tubing will warp in due time. but i haven't seen that yet.

                      So i've tried 2 different hose and with these 2 new hoses, have seen a weird phenomenon possibly due to vacuum pressure and heat.

                      i tried air hose i.d. 300 psi anti kink hose. it holds up to the heat, but it collapses. I'm sure the vacuum still works but perplexes me.

                      the same happens when i bought some silicone engine dress hoses. I'll take some pictures later to demonstrate.


                      2. As far as doing this on your old engine, WHAT THE HELL ARE YOU TALKING ABOUT? our accords are tanks! they''ll last forever. It won't give you any noticeable horsepower, it's just one more step to keep your engine cleaner and prevent detonation (the chances are slim).

                      3. i'll take pictures with the different hoses.
                      BBB= Black Bumpered Beauty

                      MY MEMBERS RIDE PAGE


                      '98 Prelude (BB6) Type SH

                      Comment


                        #12
                        My question is this:

                        Why take out the already installed filter; it should filter and allow the oil to drip out into the tube. I guess my question spawn from this: If the filter is a water/air filter then wouldn't the water act closely to that of the oil?

                        BTW just picked my stuff up (your prices were cheaper mine came out to almost 40 bucks.

                        Regardless awesome DIY...mind if I share this on a couple other boards?

                        *please keep pictures up for a while please *
                        No more cb7, 7 years of ownership and 196K on the ticker before she was sold

                        Current beast: 98 ej8 on 7psi with a 15g turbo and other goodies!

                        NREMT-B | 300D and some glass

                        Comment


                          #13
                          i will be doing this tommorrow, you think home depot or lowes would have everything need in that parts list? hardest thing to get probably is the oil catch tank. thanks.

                          Comment


                            #14
                            Y not just use the automotive lines for the tubing.. I think I used fuel line... It will not collapse or do anything w/the heat. I will be picking the stuff up tomorrow most likely, and i'll prolly use the tube that you can get at autozone. I'll be taking pics.. but need to find a host.

                            cokinut.. do you use photobucket a lot? and can you link to the pics on there from anywhere? and is it free or does it cost something? Good write up BTW... even your pics of just simple things look great!

                            Comment


                              #15
                              yeah fuel line would work much better imo, i think i will do the same thing

                              Comment

                              Working...
                              X